Erőforrás-menedzsment
Hogyan használja az Erőforrás-menedzsment modult
A foglálást a rendszer mindig egyenletesen tervezi, akkor is ha az alapértelmezett allokátor más.
Webinárium #1, Webinárium #2, Erőforrás irányítópult, Resource master plan
Áttekintés
Erőforrás-menedzsment globális szinten
Hogyan határozza meg a megjelenített időszakot a globális nézeten
Erőforrás-menedzsment projekt szinten
Hogyan állítsa be a jogosultságokat az Erőforrás-menedzsmenthez kapcsolódóan
Hogyan állítsa be az alapértelmezett szűrést az Erőforrás-menedzsment modulban
How to display tasks of the workers in time with their total workload
How to work with daily/weekly/monthly view of planned workload
How to work with custom allocations
How to use the Balance feature
Global resource settings
How to work with competence planning by teams and task types
How to work with attendance records
How to work with task updates and assignment using a drag & drop feature
Integration with meeting calendar
How to use event/allocation tooltips
How to update tasks' timing (start date, due date, duration, completion)
How to work with step back button (Undo)
How to use Problems button
How to work with exporting options
How to add Resource management on the personal home page
Erőforrás riport
Tippek és trükkök
Szerver követelmények
Megjegyzések a modul használatához
Áttekintés
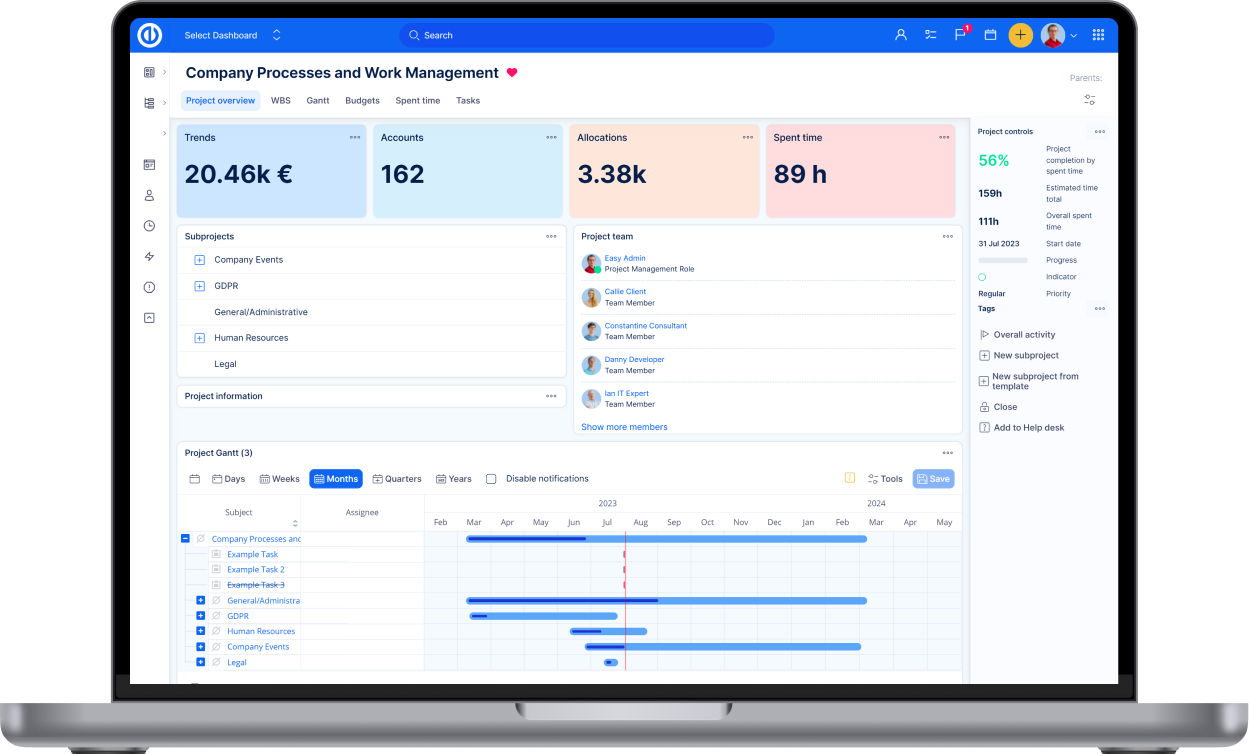
Az Easy Projectben az erőforrás-menedzsment eszköz lehetővé teszi a professzionális tervezést és munkakiosztást. A vezetők a projekttel kapcsolatos feladatokat úgy tudják tervezni, hogy figyelembe veszik a projektben résztvevők valós idejű kapacitását és a feladatokra tervezett becsült időket. Az erőforrás-menedzsment eszköz segítségével a vezetők a projektek ütemtervét figyelembe véve ki tudják egyenlíteni a munkaterhelést a kollégák között. Az eszköz segítségével könnyen áttekintheti, hogy a projektben résztvevők mikor túlterheltek, és mikor van szabad kapacitásuk további feladatok elvégzésére. Az erőforrás-menedzsment eszköz teljes mértékben megfelel az IPMA & PMI Projektmenedzsment módszertani szabványoknak.
Az erőforrás-kezelést főként az alábbiak használják:
- Projektmenedzser
- Line menedzser
- IT menedzser
- Kisvállalkozások tulajdonosa
- Projektportfólió menedzser
- HR menedzser
Miért fontos az Erőforrás-menedzsment
Az erőforrás-menedzsment kulcsfontosságú eleme a tevékenység alapú erőforrás-becslésnek és a projekt emberi-erőforrás kezelésének. Mindkettő elengedhetetlen része az átfogó projektmenedzsment tervnek, ami a projekt sikeres végrehajtásához és nyomon követéséhez szükséges. A projektmenedzsmentre vonatkozó nagyobb módszertanokhoz hasonlóan, az erőforrás-menedzsment szoftver segíti az automatizálást és támogatás nyújt a projektek erőforrástervezése során, valamint az erőforrások portfólió riportjával segíti az erőforrás igények és a rendelkezésre állás áttekintését. Az eszköz célja általában annak biztosítása, hogy: (1) szervezetünkön belül legyenek olyan alkalmazottak, akik rendelkeznek a projekthez szükséges speciális készségekkel és kívánt profillal, (2) meghatározzák az új alkalmazottak számát és készségeit, és (3) kiosszák a megfelelő munkaerőt a különböző projektekre.
Az erőforrás-menedzsment hatással van az ütemtervekre és a költségvetésekre, valamint az erőforrás terhelés kiegyenlítésére és simítására. Az erőforrások hatékony kezelése érdekében a szervezeteknek rendelkezniük kell adatokkal a jövőben várható erőforrás-igényeikről, és ezek milyenségéről, összetételéről, valamint az erőforrás-kínálat jövőbeli rendelkezésre állásáról. Az előre tervezés időtávja a projektek alapján észszerűen elvárható tervezhető időszakot ölelje fel. A projektmenedzsmentben az erőforrás-kiegyenlítés érinti az ütemezést is, hiszen a szűkös erőforrások rendelkezésre állásának megfelelően kell a projektekre vonatkozó döntéseket meghozni. Az erőforrás-simítás ezzel szemben nem érinti a projekt határidejét, csak azoknak a feladatoknak az ütemezését, amelyek nem a kritikus úton vannak.
Mik az Erőforrás-menedzsment fő előnyei
- Megnövekedett bevétel – Az erőforrás-menedzsment segítségével könnyen felmérheti, hogy napi, heti vagy havi szinten mennyire használja ki teljes erőforráskészletét, és biztosíthatja, hogy a legértékesebb erőforrásait a lehető legjobban használja fel. A munkaterhelés kiegyenlítésével elkerülheti az üres járatokat.
-
Konfliktusmegoldás - Az erőforrásigény-ütközések jelentős hatást gyakorolhatnak a bevételre, legrosszabb esetben a megoldatlan esetek miatt elvesznek bevételi lehetőségek, valamint ronthatja az ügyfelek elégedettségét.
-
Projektmegvalósítás javítása – A sikeresebb projektmegvalósítás csökkenti a költségeket és növeli a profitot. Az erőforrás-menedzsment segítségével számos szempontot tud figyelembe venni az erőforrás-kiosztásakor, például az erőforrások rendelkezésre állása, képességei és elérhetősége (helyszín), így biztosíthatja, hogy a megfelelő embereket ossza a megfelelő feladatokra.
- Csökkenti az adminisztrációs költségeket – Az globális, naprakész riportokon a tényleges terhelését láthatja a teljes erőforrás készletének, így csökkentheti az adminisztrációs költségeket, amelyeket az elavult rendszerek fenntartása okoz. Ezen felül növelheti bevételeit, maximalizálhatja a bevételt-termelő tevékenységeket, és javíthatja az ügyfél kapcsolatait. Csak az integrált, erőforrás-menedzsment szoftverek biztosítják az ehhez szükséges átláthatóságot, kontrollt és lehetőségeket.
Erőforrás-menedzsment globális szinten
Az Erőforrás-menedzsment modul globális és projekt szinten is elérhető. A globális nézethez menjen a Több menü » Erőforrás-menedzsment menüben vagy írja az Easy Project domain címe után ezt: /easy_gantt_resources.
A globális szintű Erőforrás-menedzsment azoknak a felhasználóknak felel meg legjobban, akiknek fontos, hogy egyetlen képernyőn egyszerre lássák az Easy Projectben elérhető, teljes erőforráskészletet, az összes ki nem osztott feladattal együtt. A fő előnye ennek, hogy nem kell a különböző projekteket között váltania, akkor ha egyszerre több projekt erőforrásait is kezelni szeretné. Másrészt hátrányt okozhat a komplexitás, ami megnehezítheti az áttekinthetőséget, egyértelműséget és gyorsaságot, ezért azt javasoljuk, hogy a globális nézetet akkor használja csak, ha szükséges.
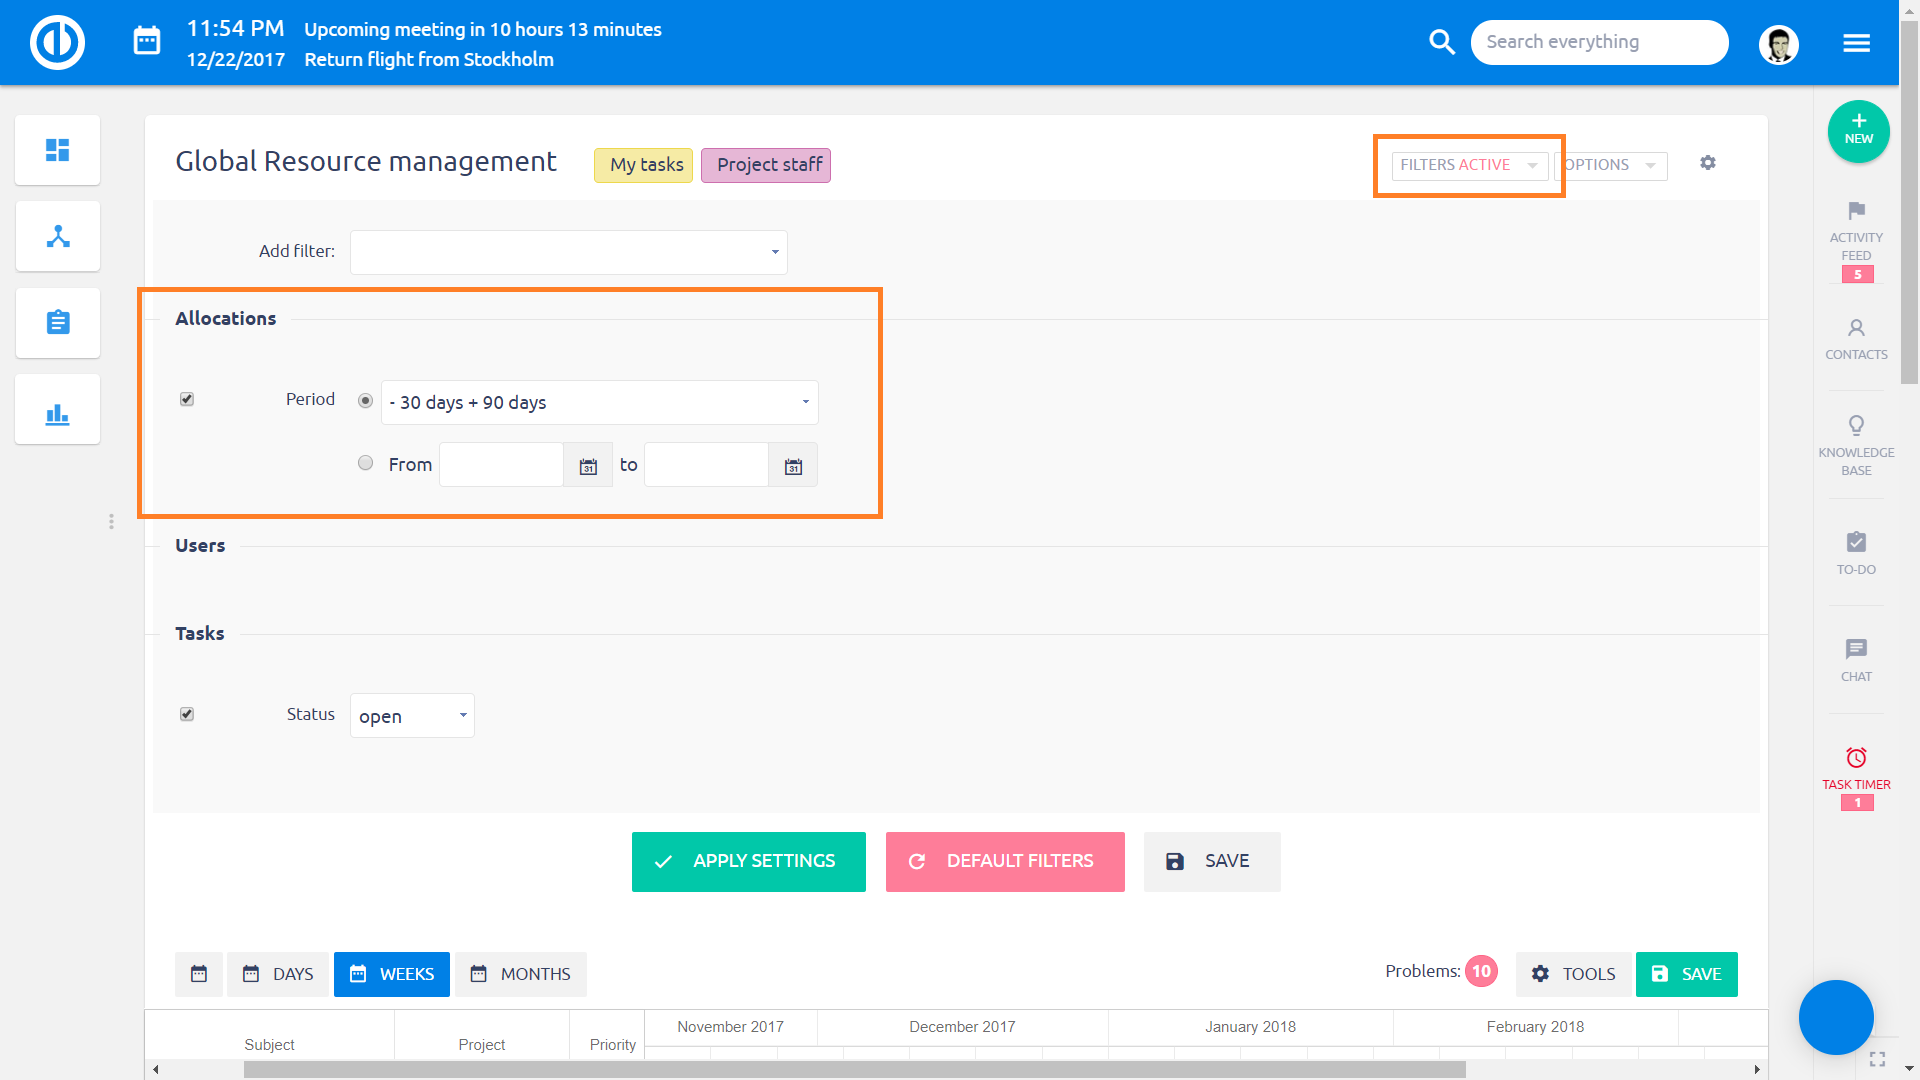
Hogyan határozza meg a megjelenített időszakot a globális nézeten
Az erőforrás-menedzsment globális nézetén meg kell határoznia a megjelenített időszakot (alapértelmezett beállítás szerint az időszak -30 +90 nap). Ehhez kattintson a Szűrők gombra, és ellenőrizze az Időszakot az Allokációk alatt. Ha be van állítva, láthatja, hogy a kiválasztott időszak világosabban jelenik meg, mint az idővonal többi része, így jobb áttekintést biztosít az erőforrások elosztásához. Nem jelennek meg azok a feladatok, amelyek kezdő dátuma és határideje is az időszakon kívül van (az időszakon belül kezdődő vagy végződő feladatok megjelennek), így az oldal is gyorsabban tölt be, és a releváns adatokkal tud dolgozni.
Erőforrás-menedzsment projekt szinten
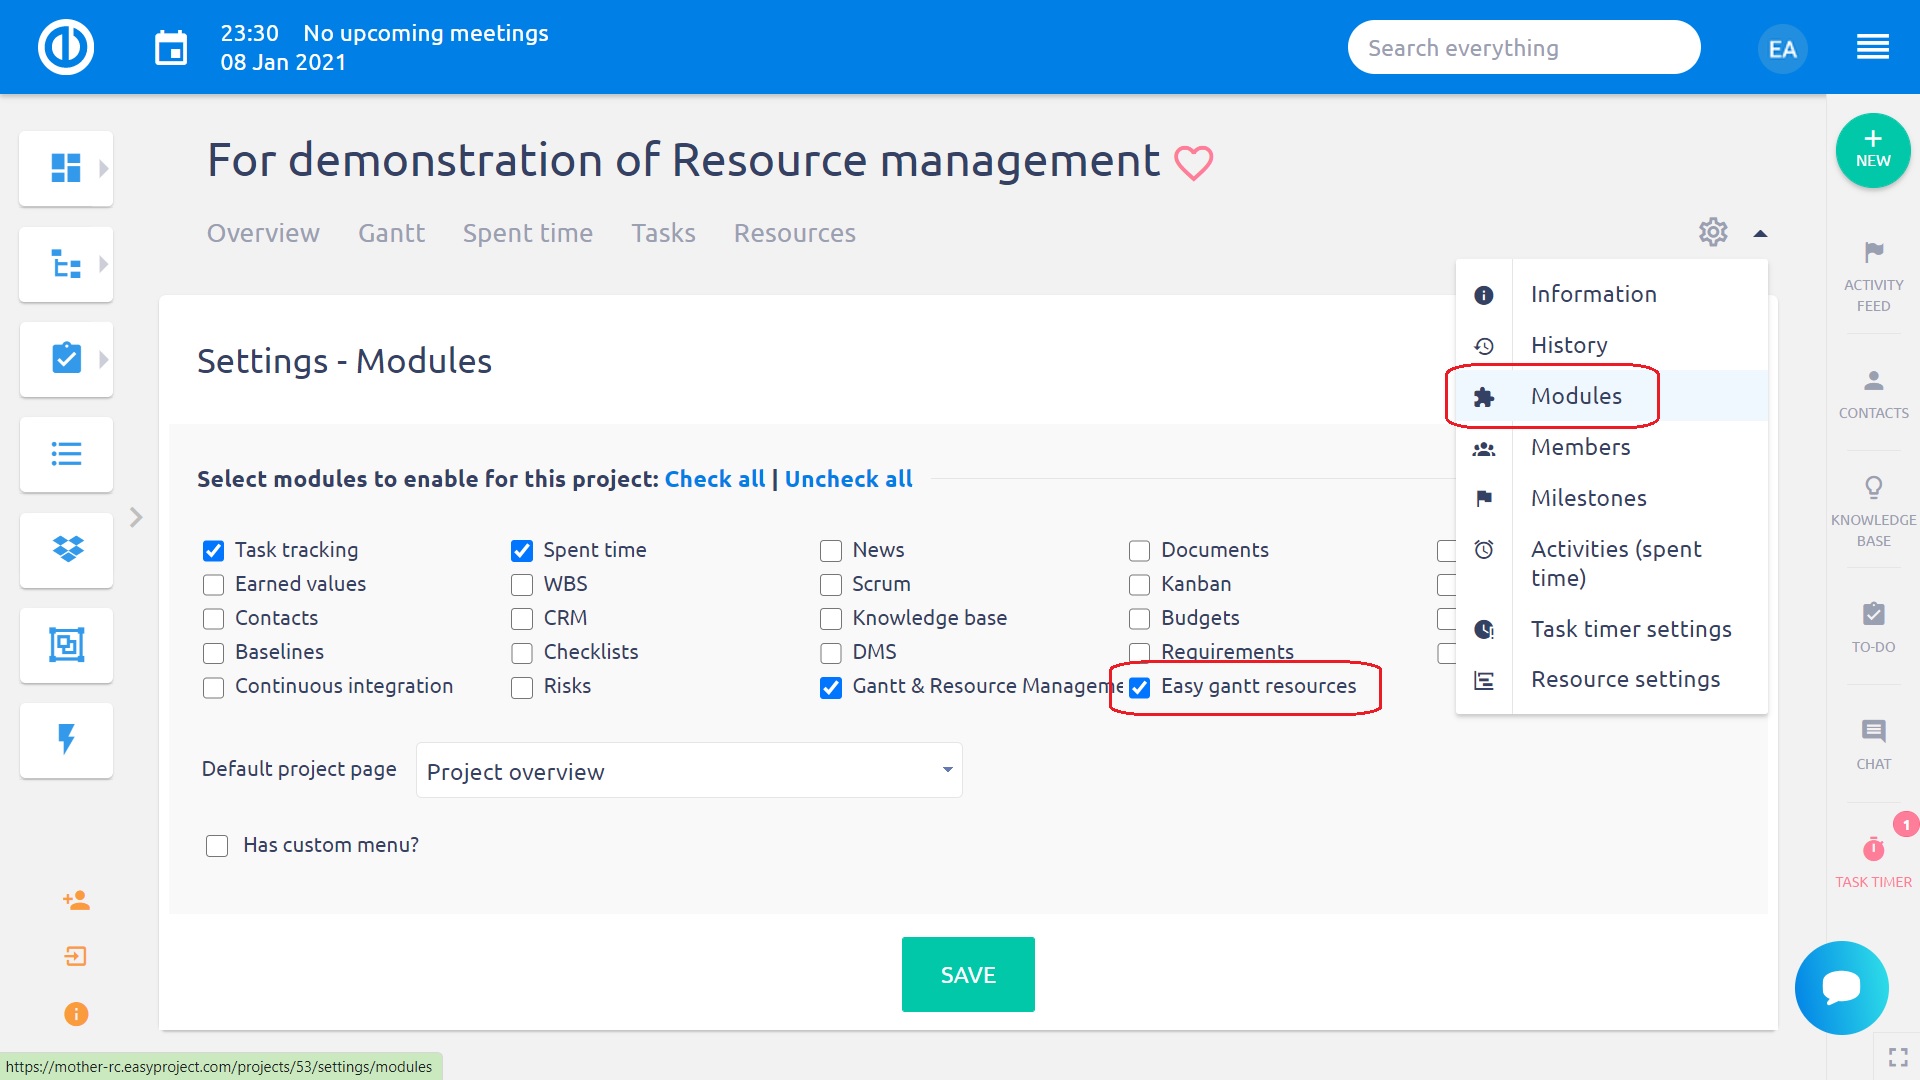
Az Erőforrás-menedzsment projekt szinten is elérhető, ehhez engedélyeznie kell a projekt beállítások (fogaskerék ikon) modulok menüjében a Easy Gantt Erőforrásokat az alábbi kép alapján.
Immediately after activating the module, the Resource management tab will appear in the top menu of the particular project. Click on it and Resource management will open. Using the functionality on the project level is a better choice for the users who need to manage resources of the particular project only so there is no need to see them for all the projects as on the global level. Another difference is that Resource management on the project level is integrated with Easy Gantt so you can effectively work with both the modules together which is not possible on the global level. If you open a parent project in Resource management, only the selected project is displayed, not its subprojects and their tasks.
Hogyan állítsa be a jogosultságokat az Erőforrás-menedzsmenthez kapcsolódóan
The permissions for Resource Management can be set up in More » Administration » Roles and permissions » Easy gantt resources. Moreover, the Edit button (enabling you to work with Resource Management) is only available when the permission "Manage tasks relations" is enabled (can be found under Roles and permissions » Project permissions » Task tracking » Manage task's relations).
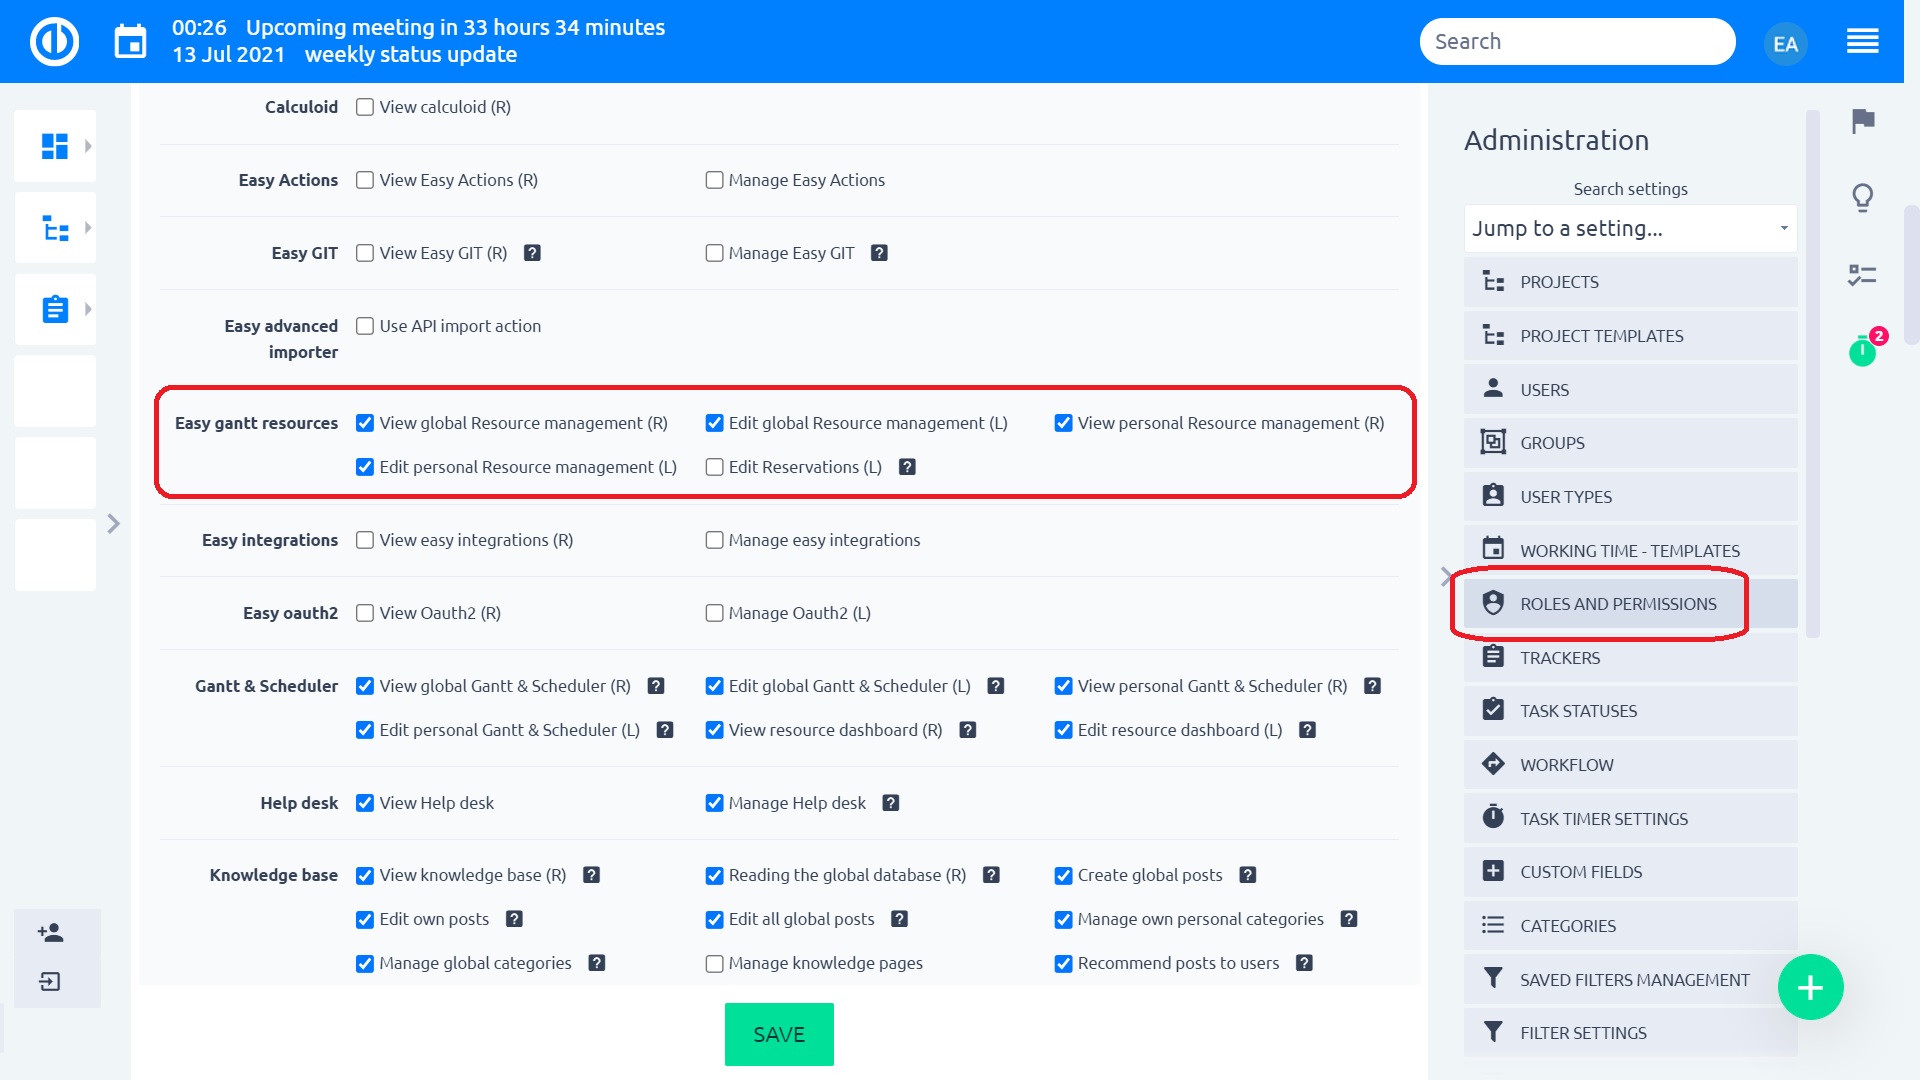
Please note that some permissions are dependent on others. For example, the Edit button will only be available when permissions "View Easy Gantt" and "Manage tasks relations" are enabled. To view/edit Resource Management, you need permission to view/edit Easy Gantt. Permission "View estimated hours" is also required to use Resource Management.
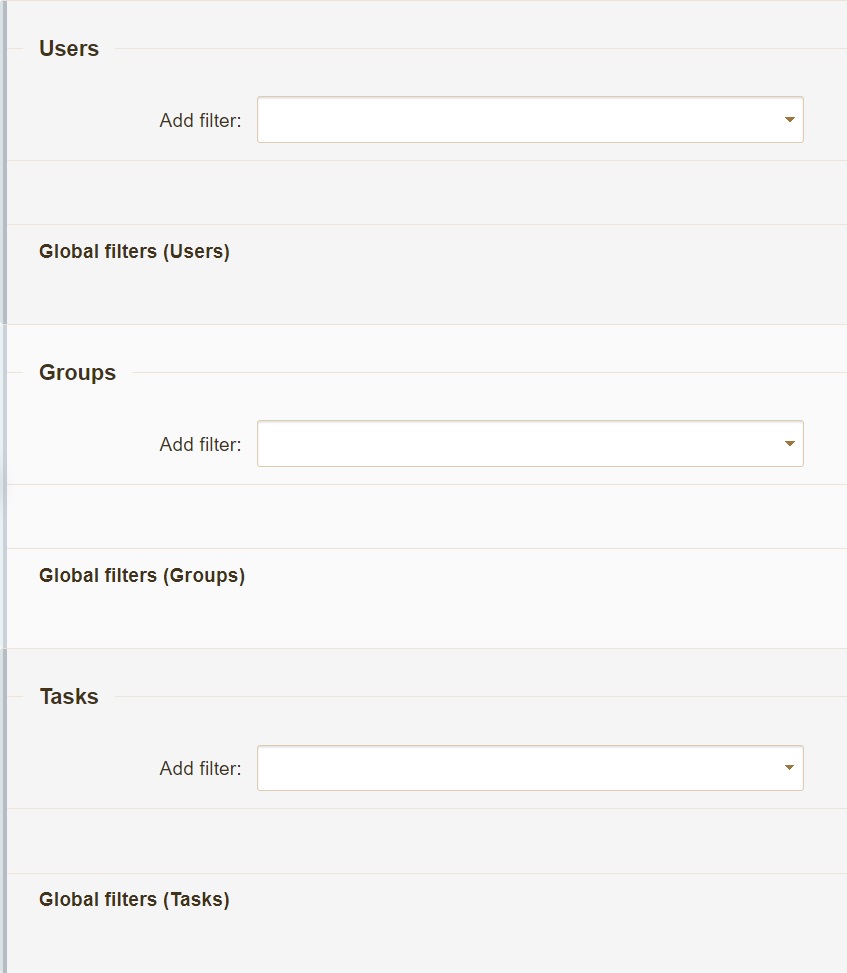
Hogyan állítsa be az alapértelmezett szűrést az Erőforrás-menedzsment modulban
Default filters are those set as system default and they are active every time for every user when no custom filters are active. To edit settings of default filters for global Resource management, go to More » Administration » Filter settings » Resource management.
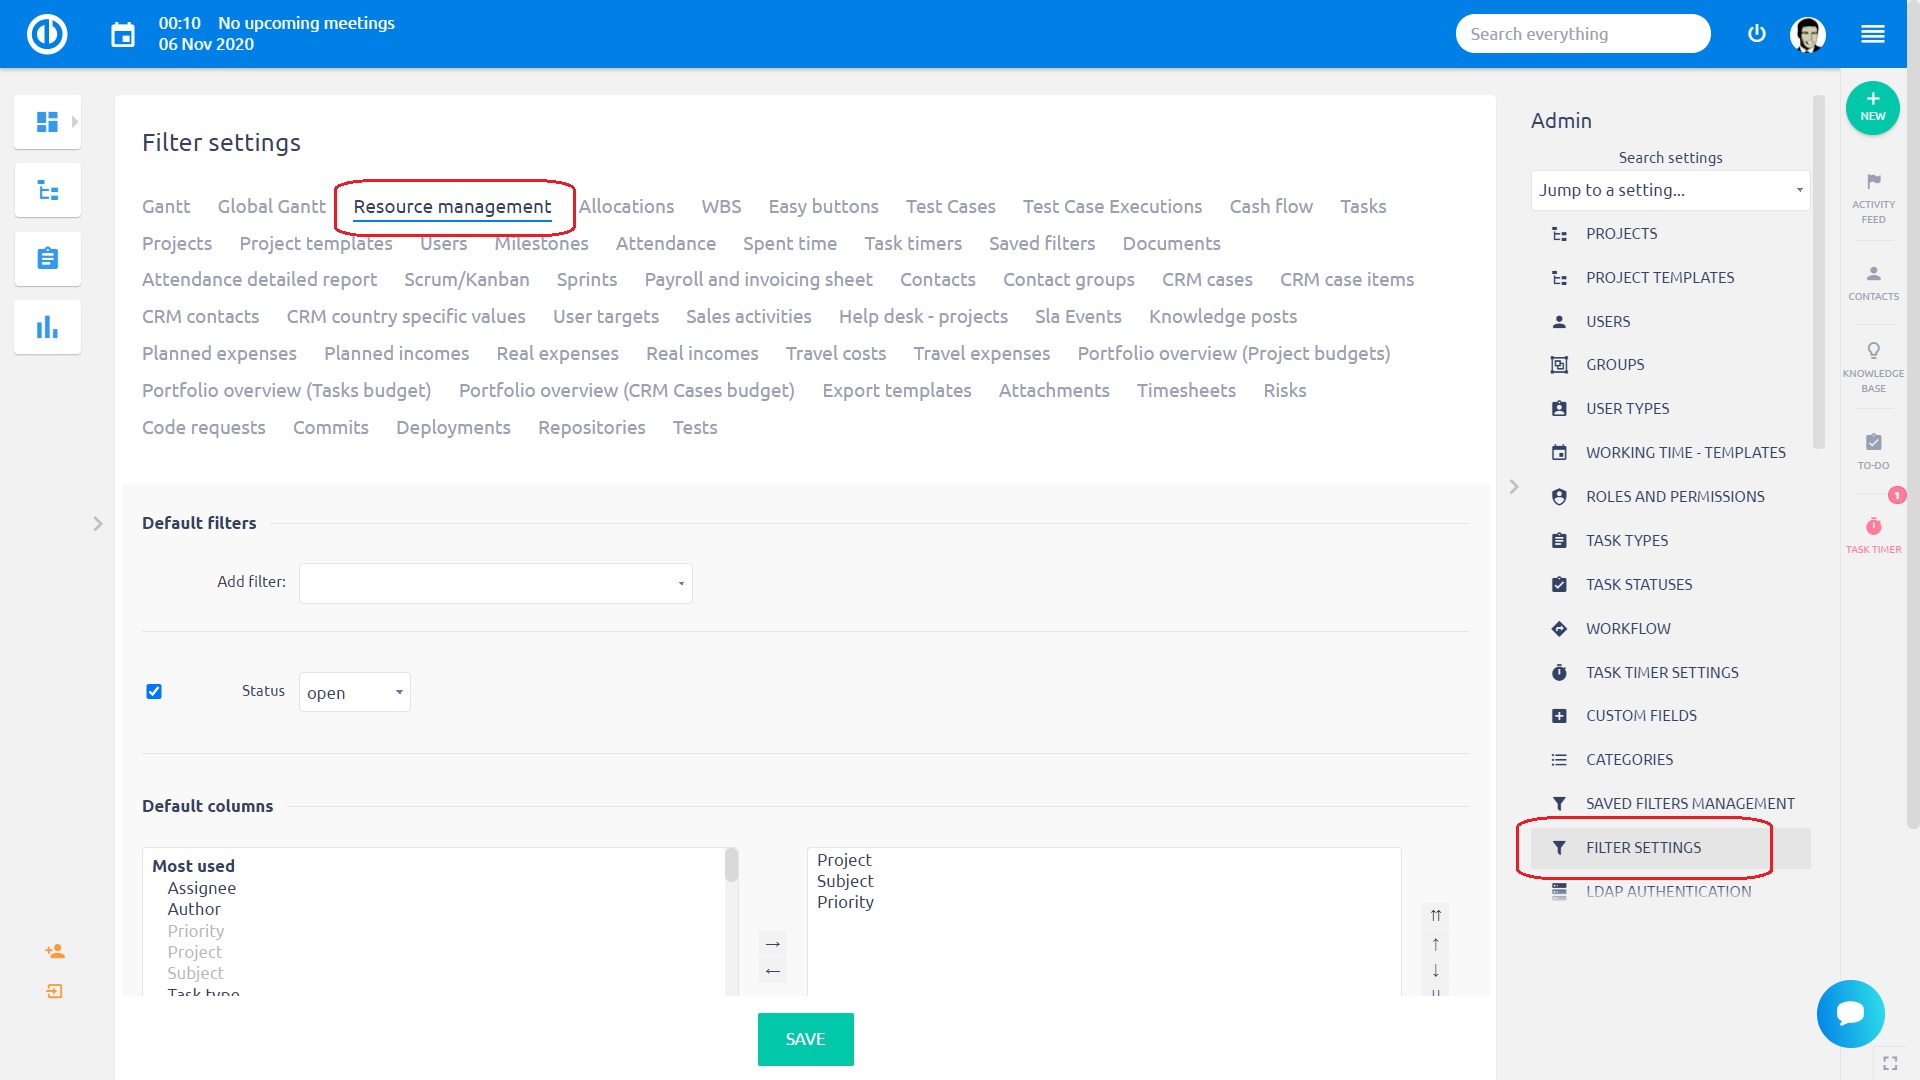
The available options are as follows:
- Add filter (select one or more filters that will be applied simultaneously)
- Default custom formatting (choose if a specific custom formatting scheme will activate along with the filter)
- Default columns (choose columns from the list that will show as default and move them to the right field)
- Group results by (results can be grouped by selected criteria, such as priority, project, user, due date etc.)
- Show avatars (shows personal user avatars, i.e. little profile images)
Now, when you save the filters and go to Resource management, you will find the list of items filtered according to these criteria (if no custom filter is active). Default filters are valid for any other user as well.
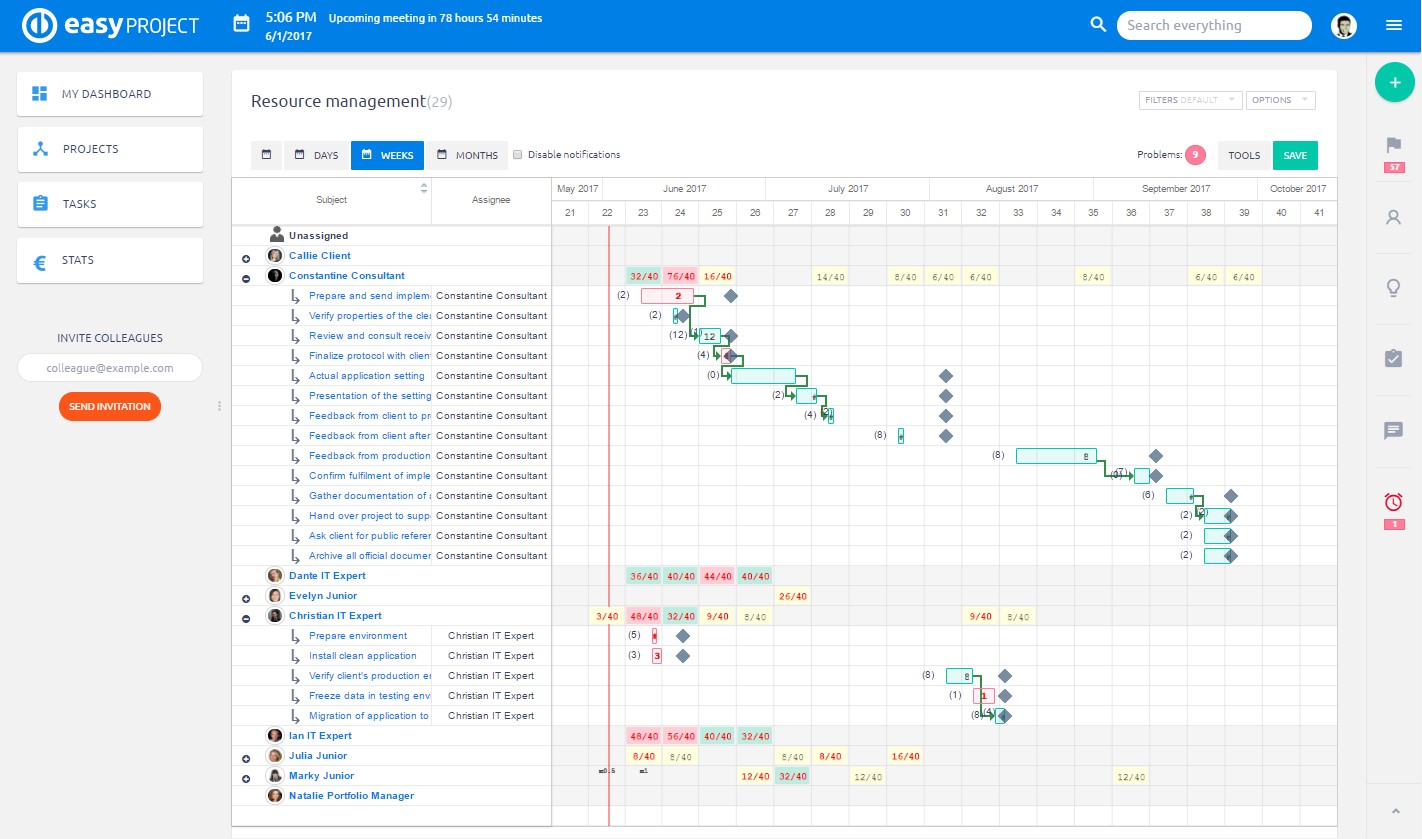
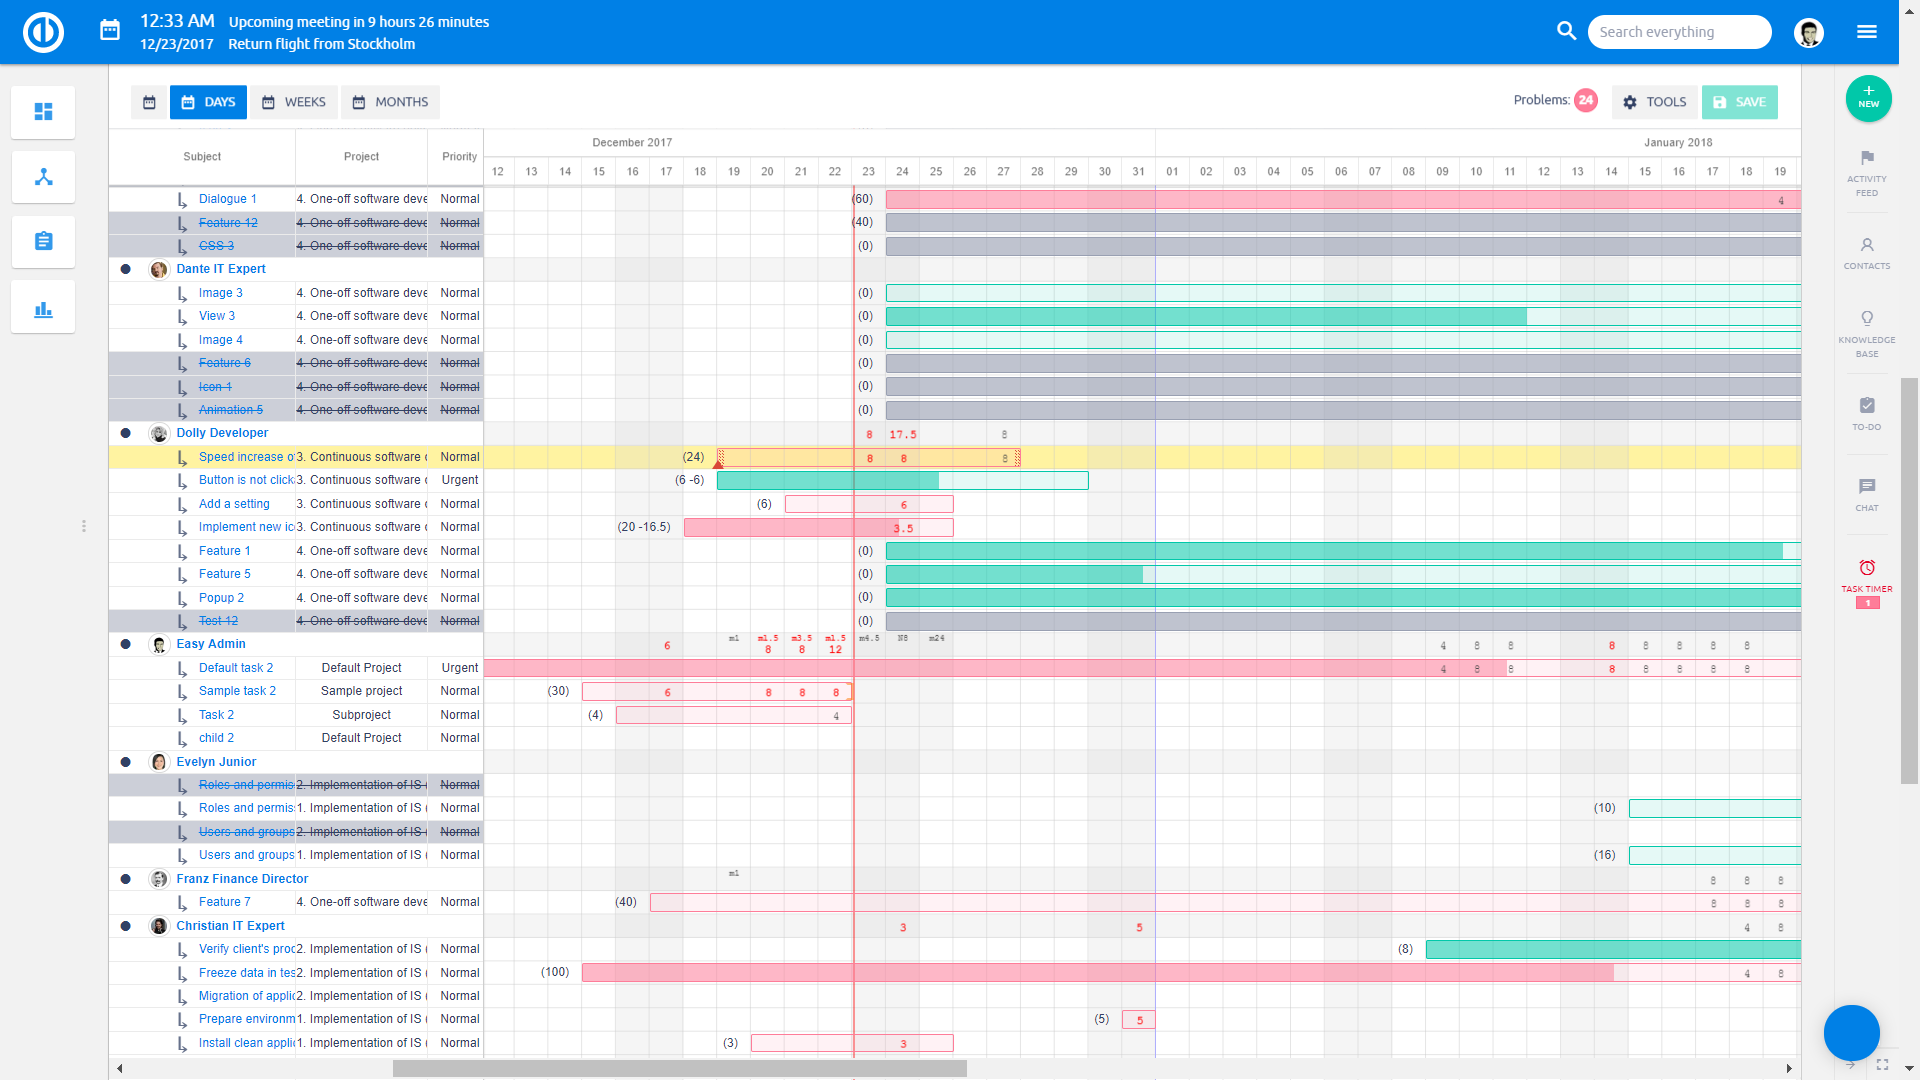
How to display tasks of the workers in time with their total workload
On the left side, you find both unassigned tasks as well as members (resources) of the particular project (on the project level) or all projects' members (on the global level). By clicking on "+" symbol next to the name, it expands the list of tasks assigned to the particular user. Each task is visualized on the timeline. The length of the task on timeline indicates the estimated number of days for realization. The numbers inside particular days (squares in the table) represent the number of hours planned for work on the task.
The total estimated number of hours for the task is automatically distributed among working days of the task duration starting from the back (due date) by default. For example, when the total estimated time for a task is 20 hours and task duration is 4 days, it will be distributed the following way: 0 hours on day 1, 4 hours on day 2, 8 hours on day 3 and 8 hours on day 4. This shows you when is the latest possible time to start working on the task in order to complete it within the due date. If a task is missing one date (start date or due date), the allocations are then calculated in the direction from the fixed date per 8 hours (resp. max allocable hours per day) and the task stretches accordingly in order not to overload. For example, the <20) changes to <8|8|4) where angle bracket is a fixed date and round bracket is undefined.
The maximum number of allocable hours per day can be set up in Resource settings in the upper right corner. When the number of hours is negative, it means that really spent time on the task has been higher than estimated time for the task in a day. When the whole task is green, it indicates there is no problem. When it's red, there is some issue with the task, most typically task duration is too short for its estimated hours' count or the number of hours exceeds max allocable hours per day. When a task is gray, it's closed.
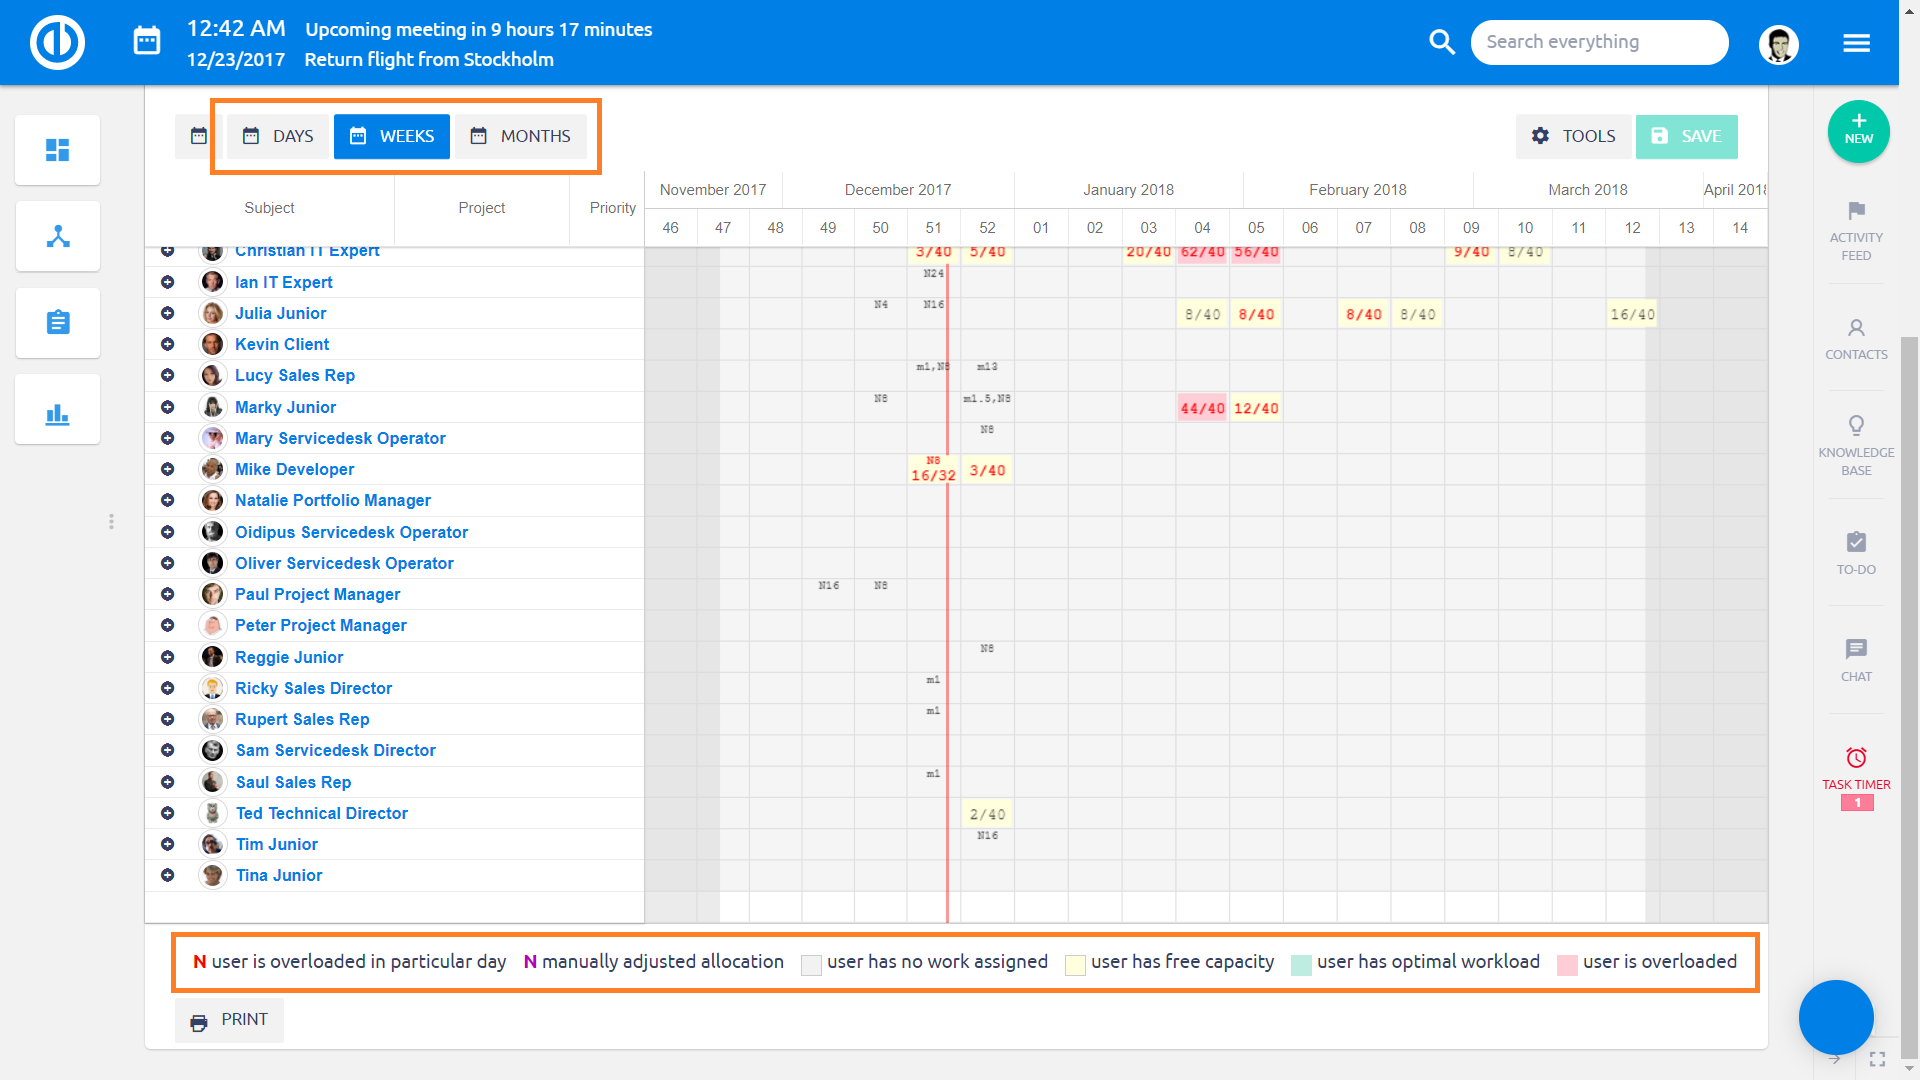
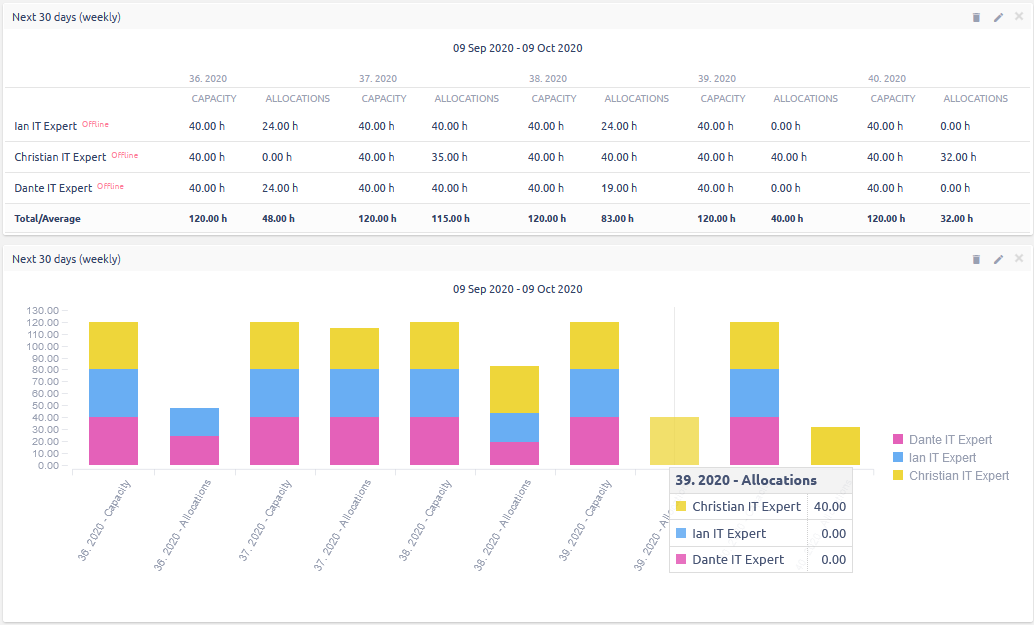
How to work with daily/weekly/monthly view of planned workload
The timeline offers types of view: days, weeks, months. Based on the project length and the necessary level of detail, they can be switched between from the top menu. When you are on a week/month view, you can see a sort of resource allocation summary per each user in the respective period. The colors indicate the level of workload as described on the image below. After switching the view to weekly/monthly basis, all workload allocations are evenly spread over the respective period.
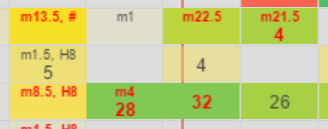
When text in cells is too long, it automatically splits into two lines and the invisible part is replaced with a hash symbol (#) as illustrated below. The purpose is to prevent text getting over to neighboring cells.
How to work with custom allocations
As was said previously, task's estimated time (hours) is automatically distributed throughout task duration (days) according to the allocation rules. If you don't like the way how the workload is allocated to individual days, you can personally reallocate it very easily. This is called custom allocation. By double-click on a particular day of the task duration, you can enter a custom number of hours. The number will turn purple then to indicate the custom allocation. The analogical way you can edit total estimated time (in brackets before the taskbar) and the daily workloads will recalculate automatically then. When a custom allocation is set, you can delete it via double-click and remove the value.

When you see two numbers in brackets before the taskbar, such as (30-10), the first number is total estimated time while the second one is time already spent on the task. Remember that any negative time value represents spent time.

When you move a task and drop it over weekend or vacation/holiday of the assignee, the number of working days in tasks' duration have to remain. Therefore, it automatically prolongs the due date of the task and allocated estimated time of the task is redistributed among working days only, skipping the days off.
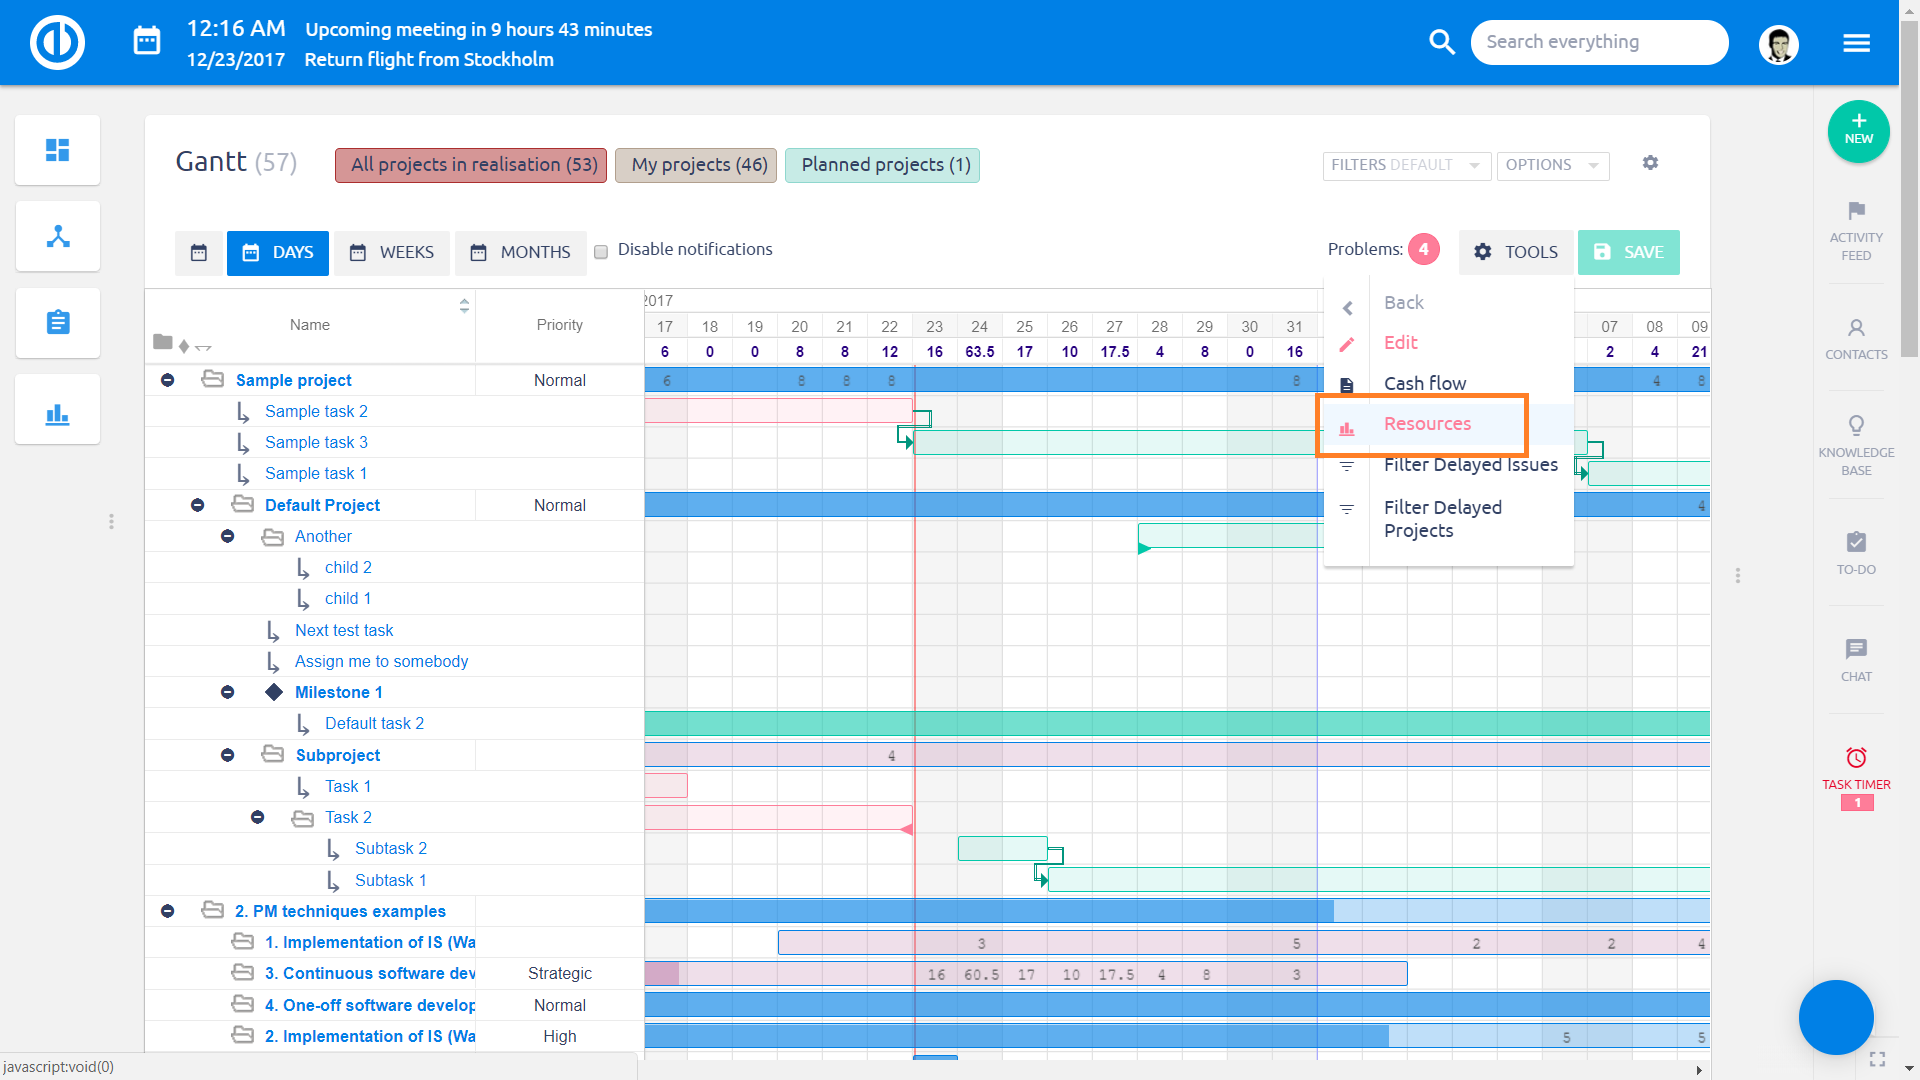
How to use the Balance feature
The Balance feature can be found in the Tools menu of Resource Management, both on the global and the project levels. By clicking on it, all allocated hours of all displayed user-assigned tasks (i.e. those expanded/visible on the timeline, not those hidden/collapsed) will automatically redistribute throughout the entire task's duration (start date - due date) based on the user's free capacity, taking into account his daily working hours, vacations as well as other task allocations.
A little difference between the global and the project levels is that the project-level balancing only works with tasks belonging to that particular project, ignoring any possibly visible tasks from different projects, and that the balancing process is always applied to all the tasks from this particular project, regardless of whether they are expanded or collapsed.
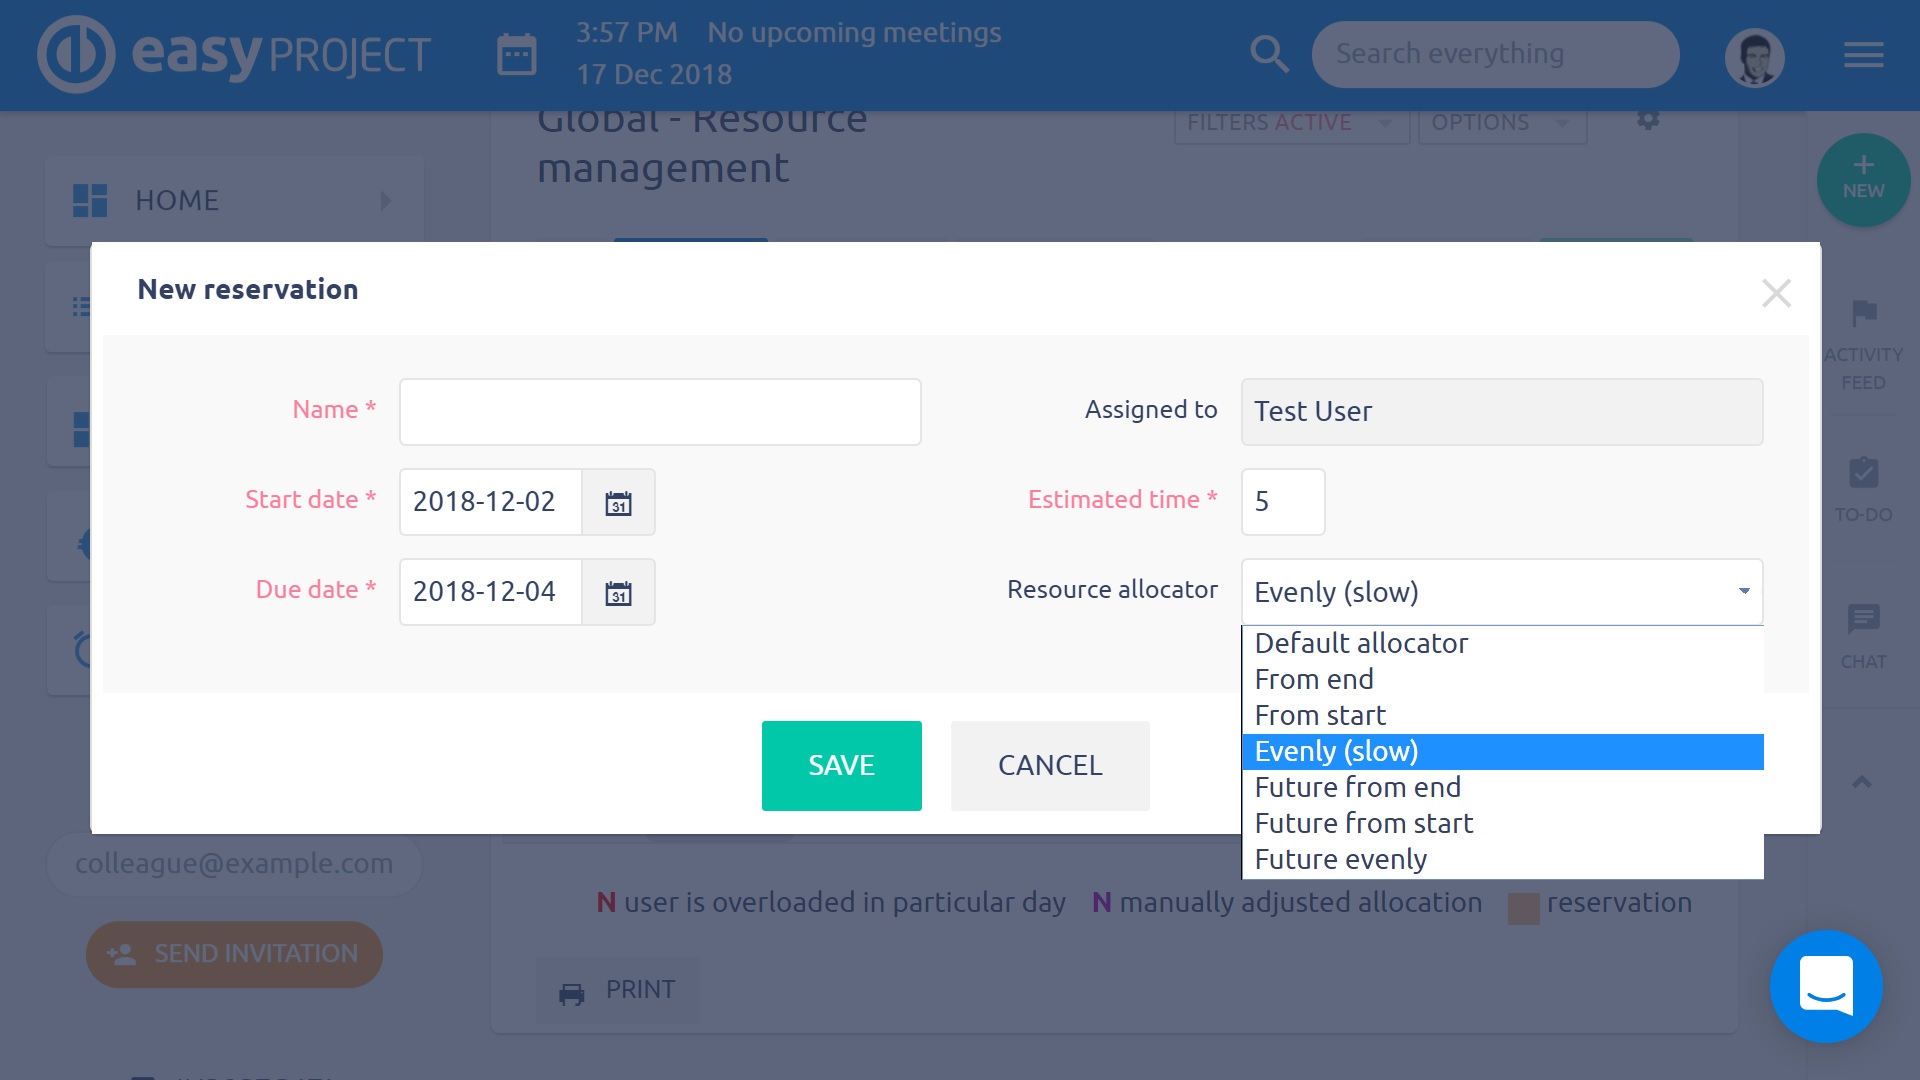
This automatic balancing process is based on the allocator type called Evenly (slow) = hours are allocated evenly throughout duration of a task, starting from today onwards. Only the last day of the task duration is never (auto)balanced because any remaining hours that could not be allocated into previous days are all moved into this last day. Likewise, when two or more tasks overlap, their allocated hours from the days of overlap are all moved to the last days of that particular tasks and must be allocated manually.
After the balancing is finished, any newly created vacations are not taken into account anymore, however, the process can be repeated to take them into account too. If you need to restore an original state of an unsaved reallocation (i.e. you did not click the Save button after the balancing process was finished), you can do it simply by refreshing the page (using F5 key). Do not use the Back button to cancel an unsaved Balance reallocation because it does not work well for this purpose. An already saved Balance reallocation can be taken back just manually by the user.
The balancing process is always executed in order of tasks' priorities - if the Priority column is displayed on the left side of Resource Management, tasks with a higher priority are balanced first (before tasks with lower priority). If the Priority column is not displayed, then tasks are balanced according to their order in the left-side list. Reservations are excluded from balancing. Reservations are allocated evenly by default, which can be changed when creating a reservation.

Global resource settings
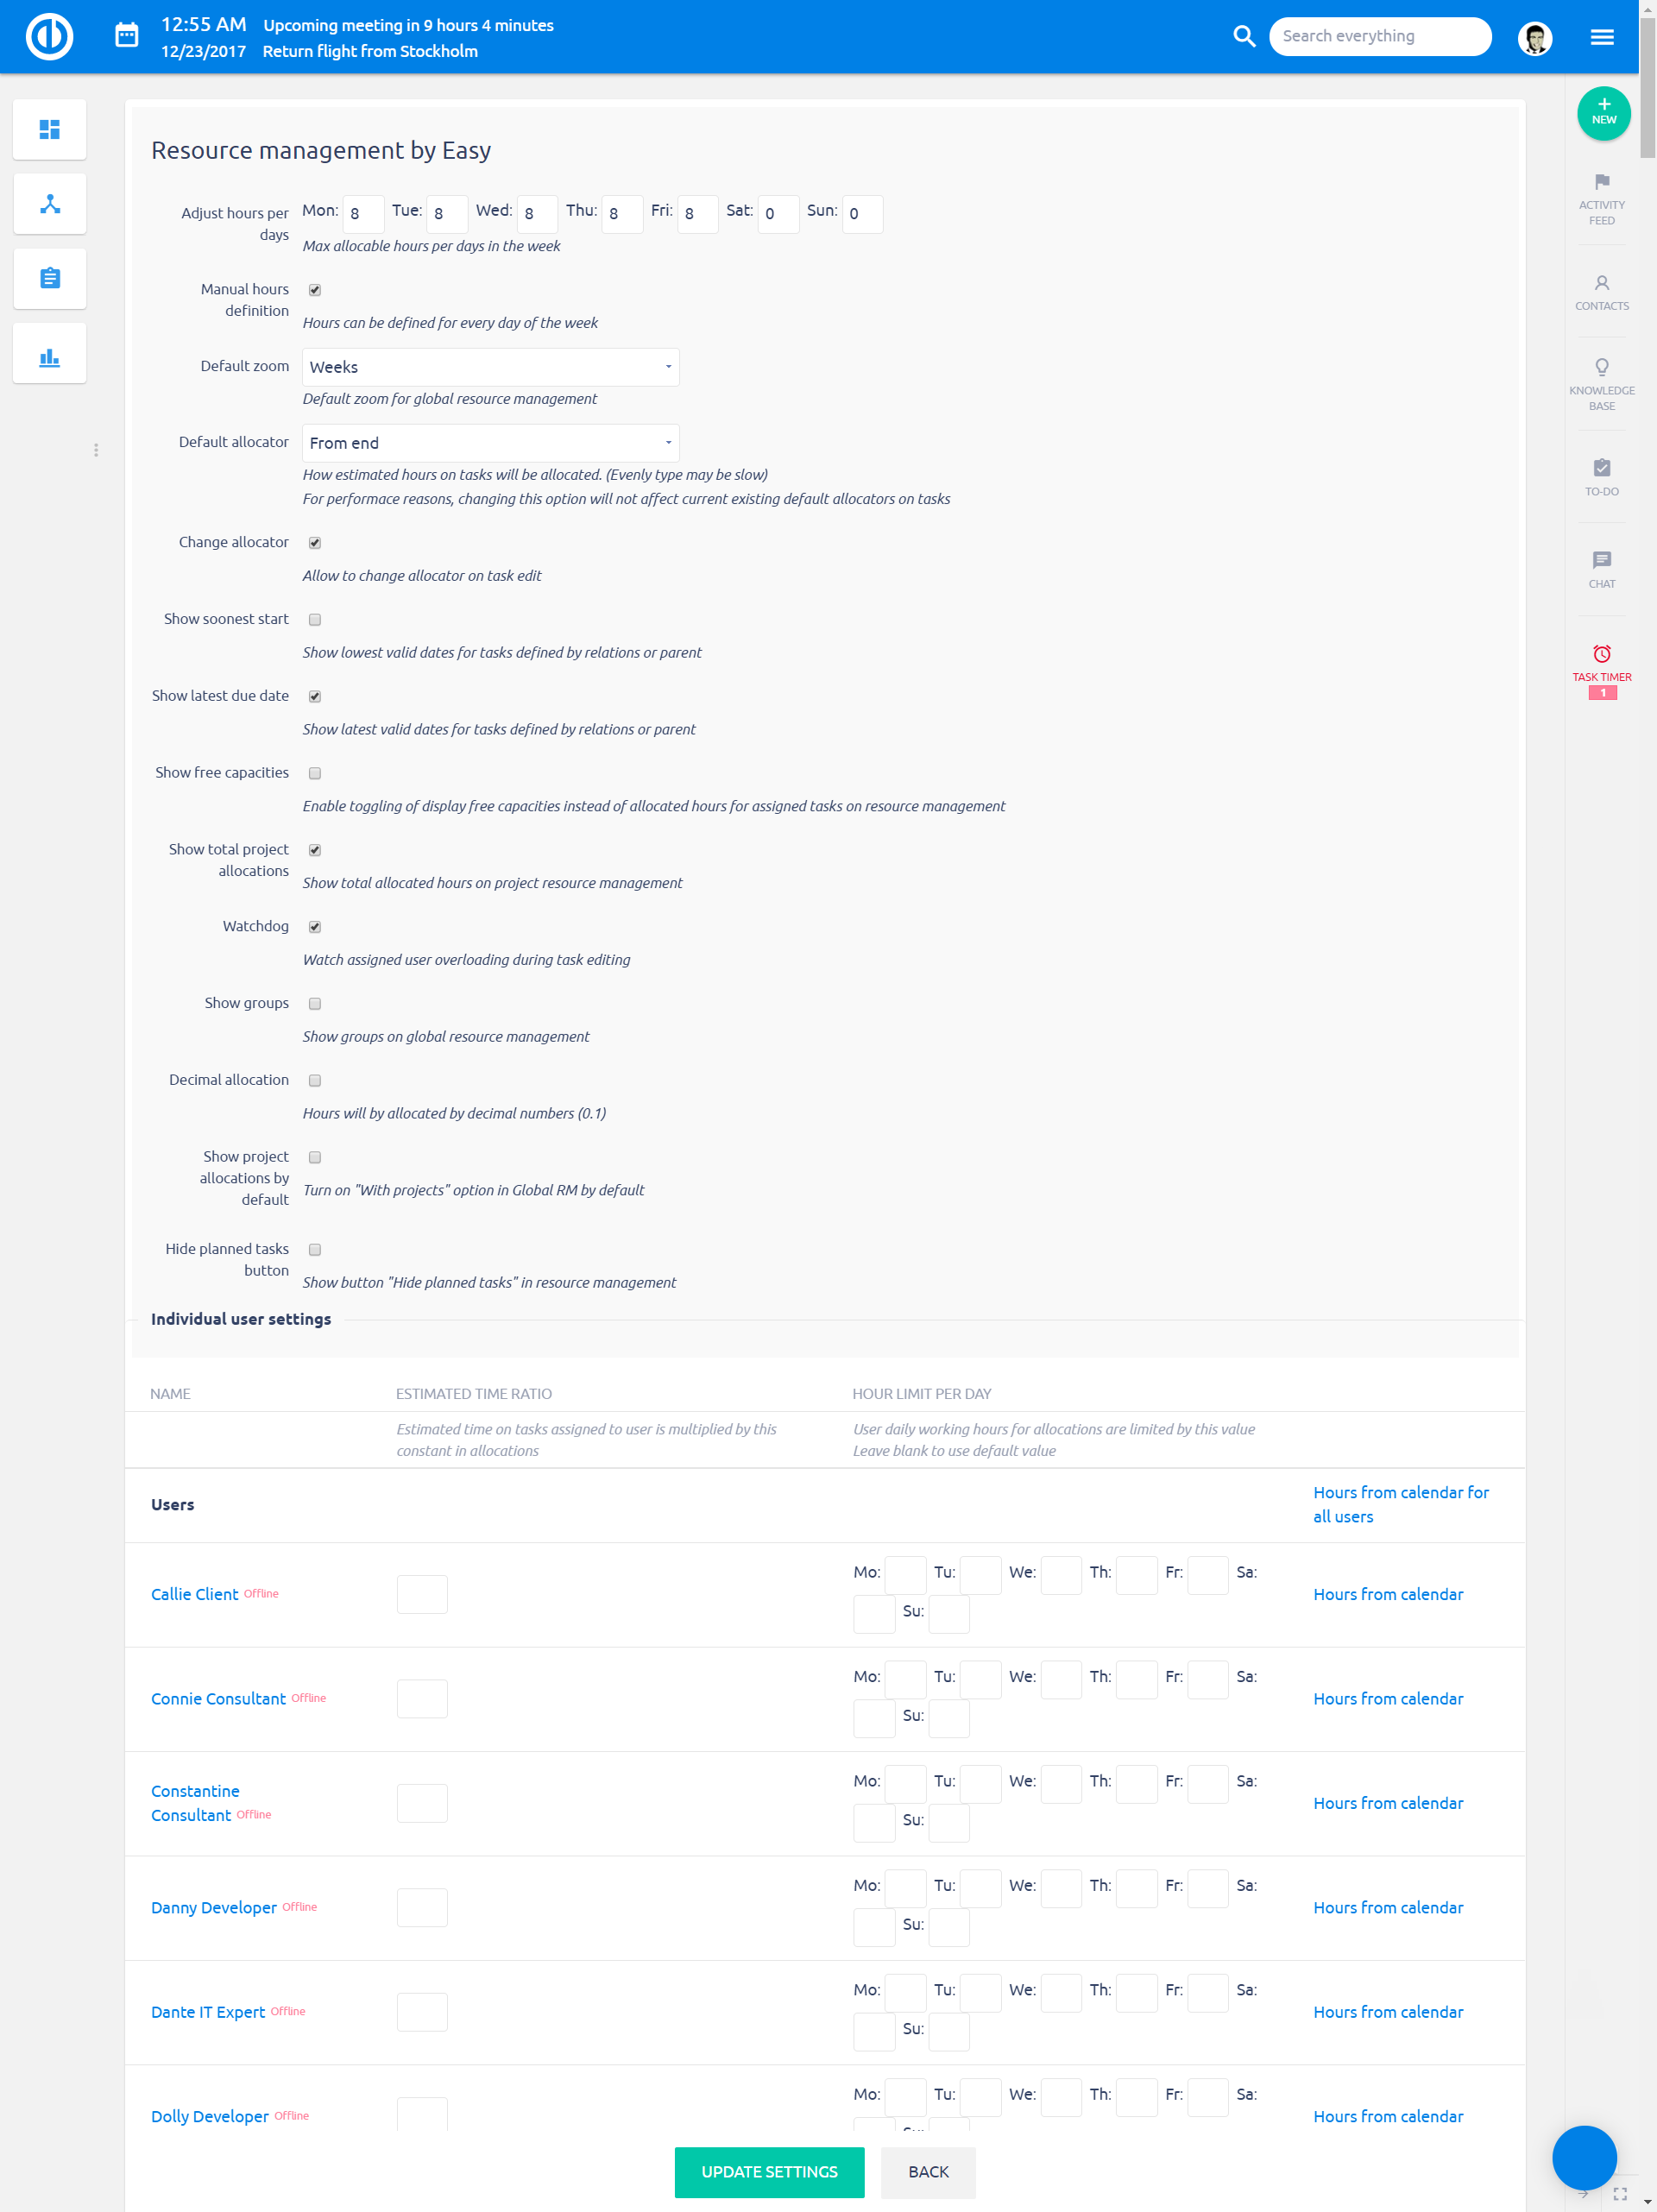
Global resource settings can be entered by clicking on the "Resource settings" button in the upper right corner of global Resource management.
The options are as follows:
- Hours per day: Max allocable hours per day for all users who have not set their individual daily working hours for allocations.
- Advance hours definition: With this option enabled, you can set the "Hours per day" limits for each day of week separately.
- Default zoom: Default zoom for global Resource management
-
Default allocator: How estimated hours on tasks will be allocated. For performance reasons, changing this option will not affect current existing default allocators on tasks. The options are as follows:
- From end - Hours are allocated from due date of a task.
- From start - Hours are allocated from start date of a task.
- Evenly (slow) - Hours are allocated evenly throughout duration of a task.
- Future from end - Hours are allocated from due date of a task towards today.
- Future from start - Hours are allocated from today towards due date of a task.
- Future evenly - Hours are allocated evenly from today towards the due date of the task. When hour limit per day is reached, all remaining hours are allocated to the due date of the task.
- Change allocator: Allow to change allocator on task edit
-
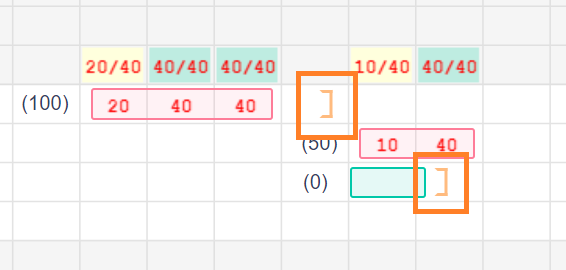
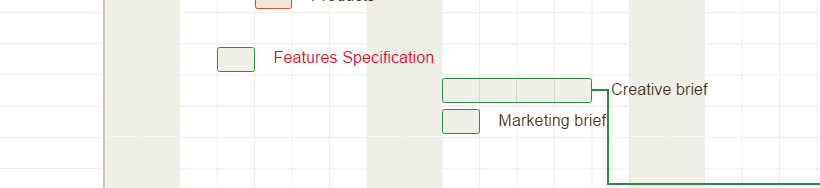
Show soonest start: Show lowest valid dates for tasks defined by relations or parent. As illustrated below, the square bracket indicates the lowest date you can move the task to, but not any further because it's related to another task that precedes it.
- Show latest due date: Shows the latest valid dates for tasks defined by relations or parent.
- Show free capacities: Enable toggling of display free capacities instead of allocated hours for assigned tasks on Resource management
- Show total project allocations: Shows the total number of allocated hours in the project-level Resource management only (not in the global-level RM).
-
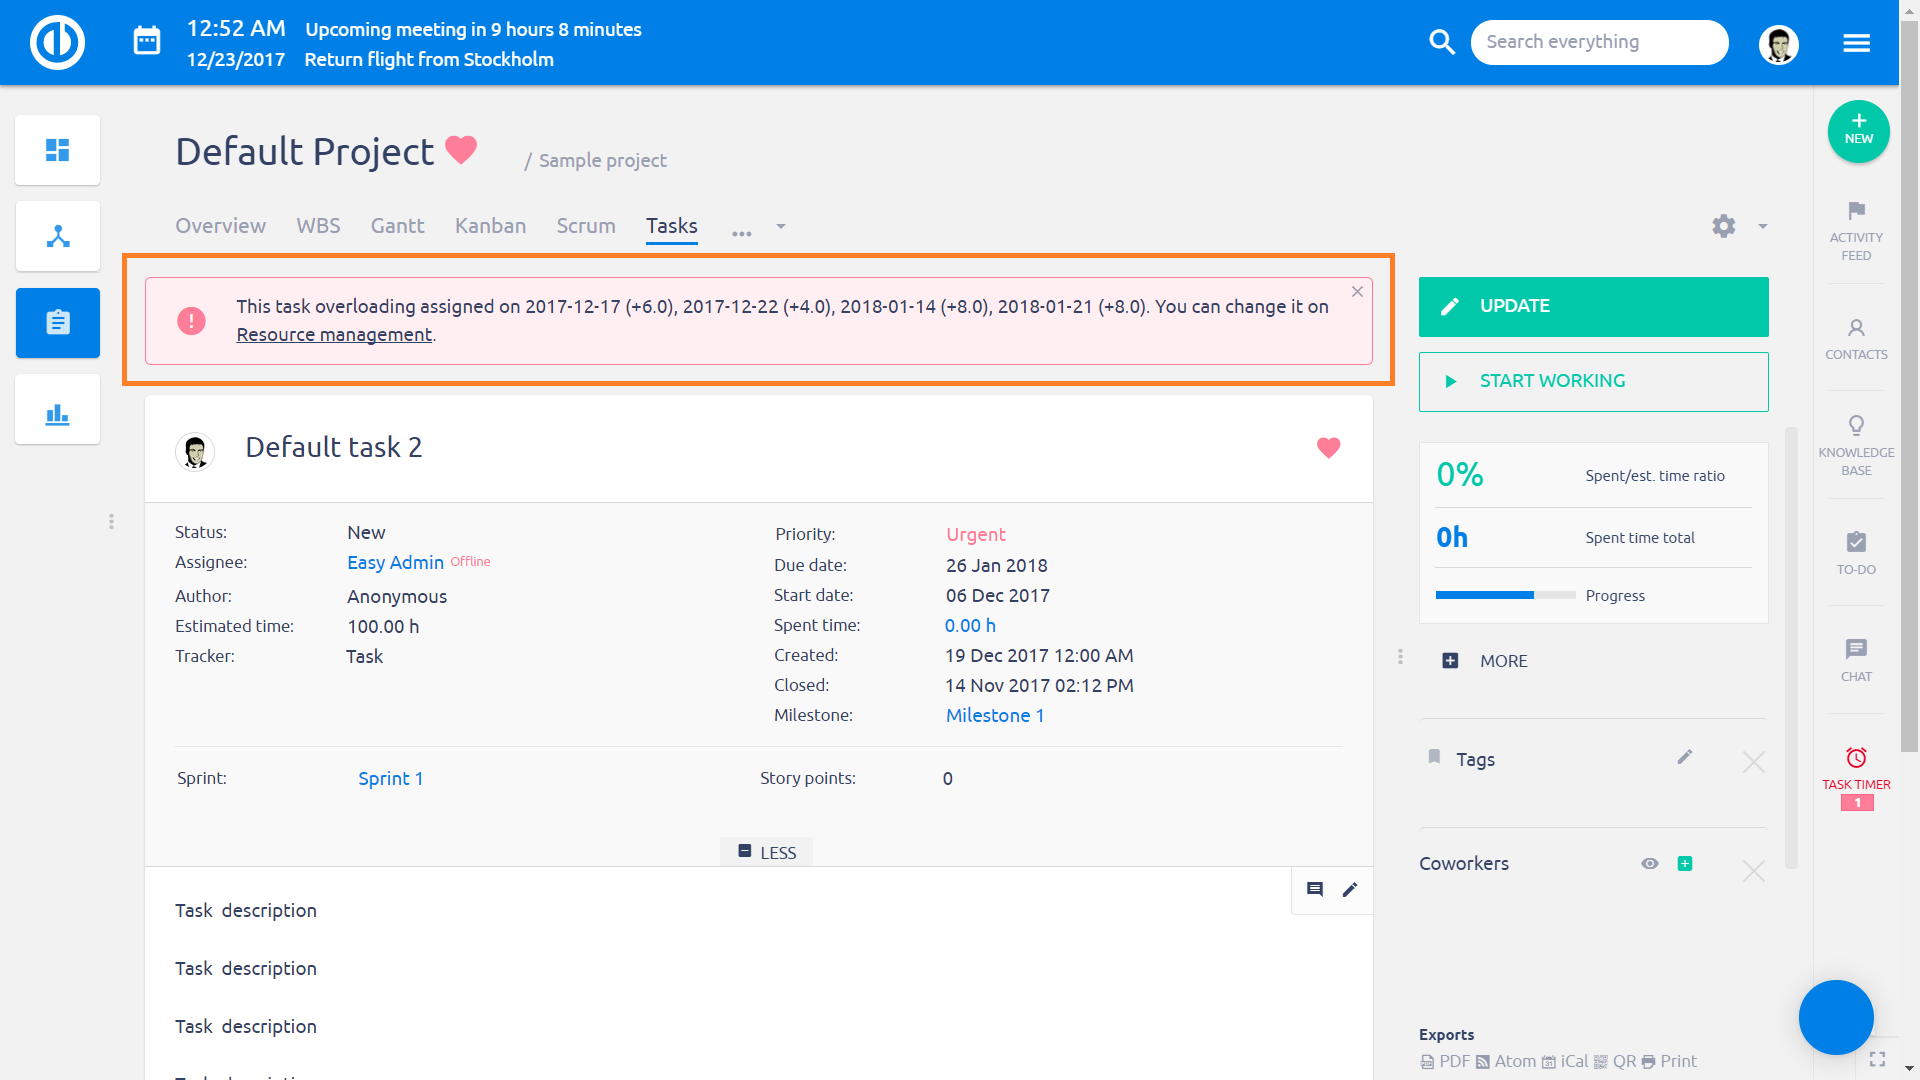
Watchdog: Watch assigned user overloading during task creation and editing, i.e. when a task has too many estimated hours related to a user's allocation capacity, a warning alert shows up in the full-screen task detail after creating or editing a task as illustrated below. The feature doesn't work when a task is unassigned, assigned to a group or anonymous user. Also, it doesn't show any alert when you are not on a task detail, for example, when assigning a task using the drag-n-drop feature in Resource management.
- Show groups: Show groups on global Resource management
- Decimal allocation: Hours will by allocated by decimal numbers (0.5, always rounds up)
- Show project allocations by default: Turn on "With projects" option in Global RM by default.
-
Enable reservations: Enable hours reservation on users. No tasks can be allocated inside the reserved hours until the reservation is canceled. You can delete or edit your reservation by right clicking on it. Click the animation below. The permission "Edit reservations", which can be enabled in Administration » Roles and permissions, is still required for the specific user role to use Reservations.
- Enable holidays for groups: Allocations are reduced if members of the group have holidays.
- Planned tasks toggle button: Show toggle "Planned tasks" in Resource Management. This button only works with planned tasks, not planned projects.
Individual user settings
- Estimated time ratio: Estimated time on tasks assigned to a user is multiplied by this constant in allocations. For example, if a task has estimated time 5 H and the ratio for assigned user is 8, he will be allocated with 40 H. This way, you can reflect different working speed of various people, such as new employee might be twice as slow compared to an experienced one.
- Hour limit per day: User daily working hours for allocations are limited by this value. Leave blank to use the default value. When working with resource allocation summary on week/month view, the colors indicating user's workload in the respective period take into account his current allocation time capacity. For example, if user A has capacity 40 hours a week, user B can work 30 hours a week while user C only 20 hours a week, then a weekly workload with estimated time 25 hours will color yellow for user A (user has free capacity - less than 70% workload), green for user B (user has optimal workload - more than 70% workload) and red for user C (user is overloaded - equal or more than 100% workload).
Groups
- Here you can set both "Estimated time ratio" and "Hour limit per day" for entire groups. The values can be entered either manually or let it count automatically from group members. If no values are set for individual users, they are evenly distributed among group members. If values are set both for users and groups, the group's settings take into account user's settings and thus distribute the values accordingly among group members.
How to work with competence planning by teams and task types
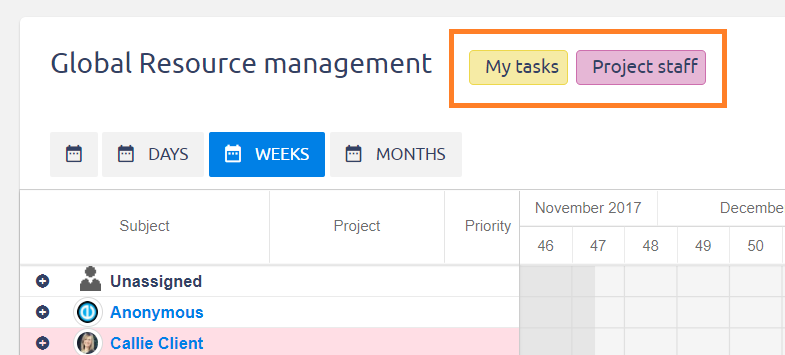
Competence planning allows you to reduce your view to the resources (users) you actually need to work with. To do it, set up and save filters by task type and user and then make them visible in the heading like on the animation below. If you don't know how to set up the filters, check out this tutorial. Resource management supports all standard filtering options already well-known from any kinds of lists in Easy Project. This way you can show only certain tasks or users according to your preferences. Resource management offers two groups of filters - for tasks and for users.
Filters above tasks affect the right side of the table - the grid where you allocate the tasks. While filtering above users affects the left side - list of users you are allocating the tasks to. Most useful for competence management, e. g. head of development views only development tasks and development team, while chief of sales works with a different set of users and tasks.
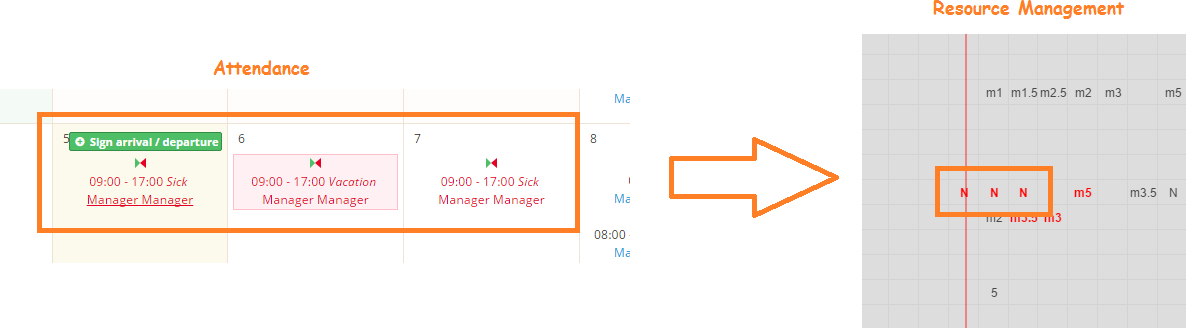
How to work with attendance records
Thanks to the communication link between Resource management and Attendance management, the days when a user is not available (due to vacation, sickness or any other reason) are displayed on Resource management timeline with "N" symbol as shown in the image below. This will prevent the user from getting tasks for these particular days.
How to work with task updates and assignment using a drag & drop feature
You can drag a task a move it to another date simply. When a user is overloaded you can move the task to another user in the same manner. When a user is not a member of a particular project, he cannot be assigned with any task of this project.
Integration with meeting calendar
Thanks to integration with Meeting Calendar, all planned events such as meetings, holidays etc. are taken into account in workers' capacities. A day with such an event is marked by a letter such as "m" (meeting) or "H" (holiday). The number following the letter "m" indicates the estimated amount of hours for the meeting.

Event/allocation tooltips
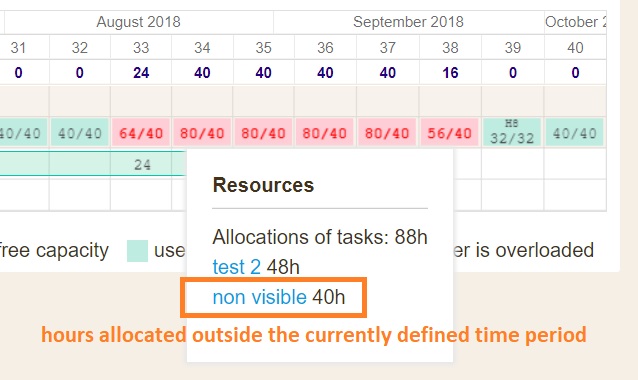
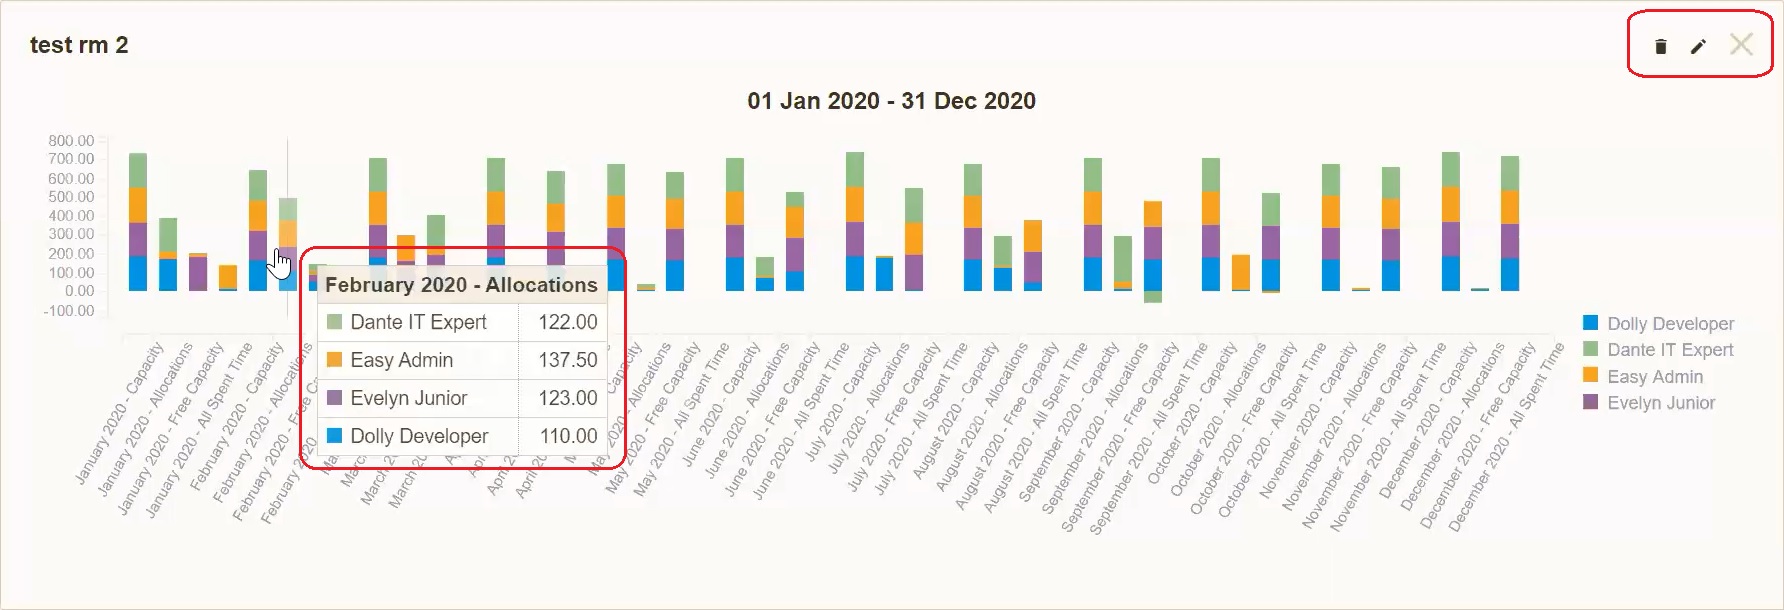
By clicking on a cell including an event, a small information tooltip appears showing the summary of the events in the selected period. The tooltip works on a daily, weekly and monthly basis as well. If there is a continuous event (vacation, business trip), the event is shown counted in the tooltip. A similar tooltip appears when you are on weekly/monthly view and click on any time allocation box on the timeline. This tooltip shows you the allocations of non-visible issues (tasks) which represent the total sum of hours for this particular week or month.
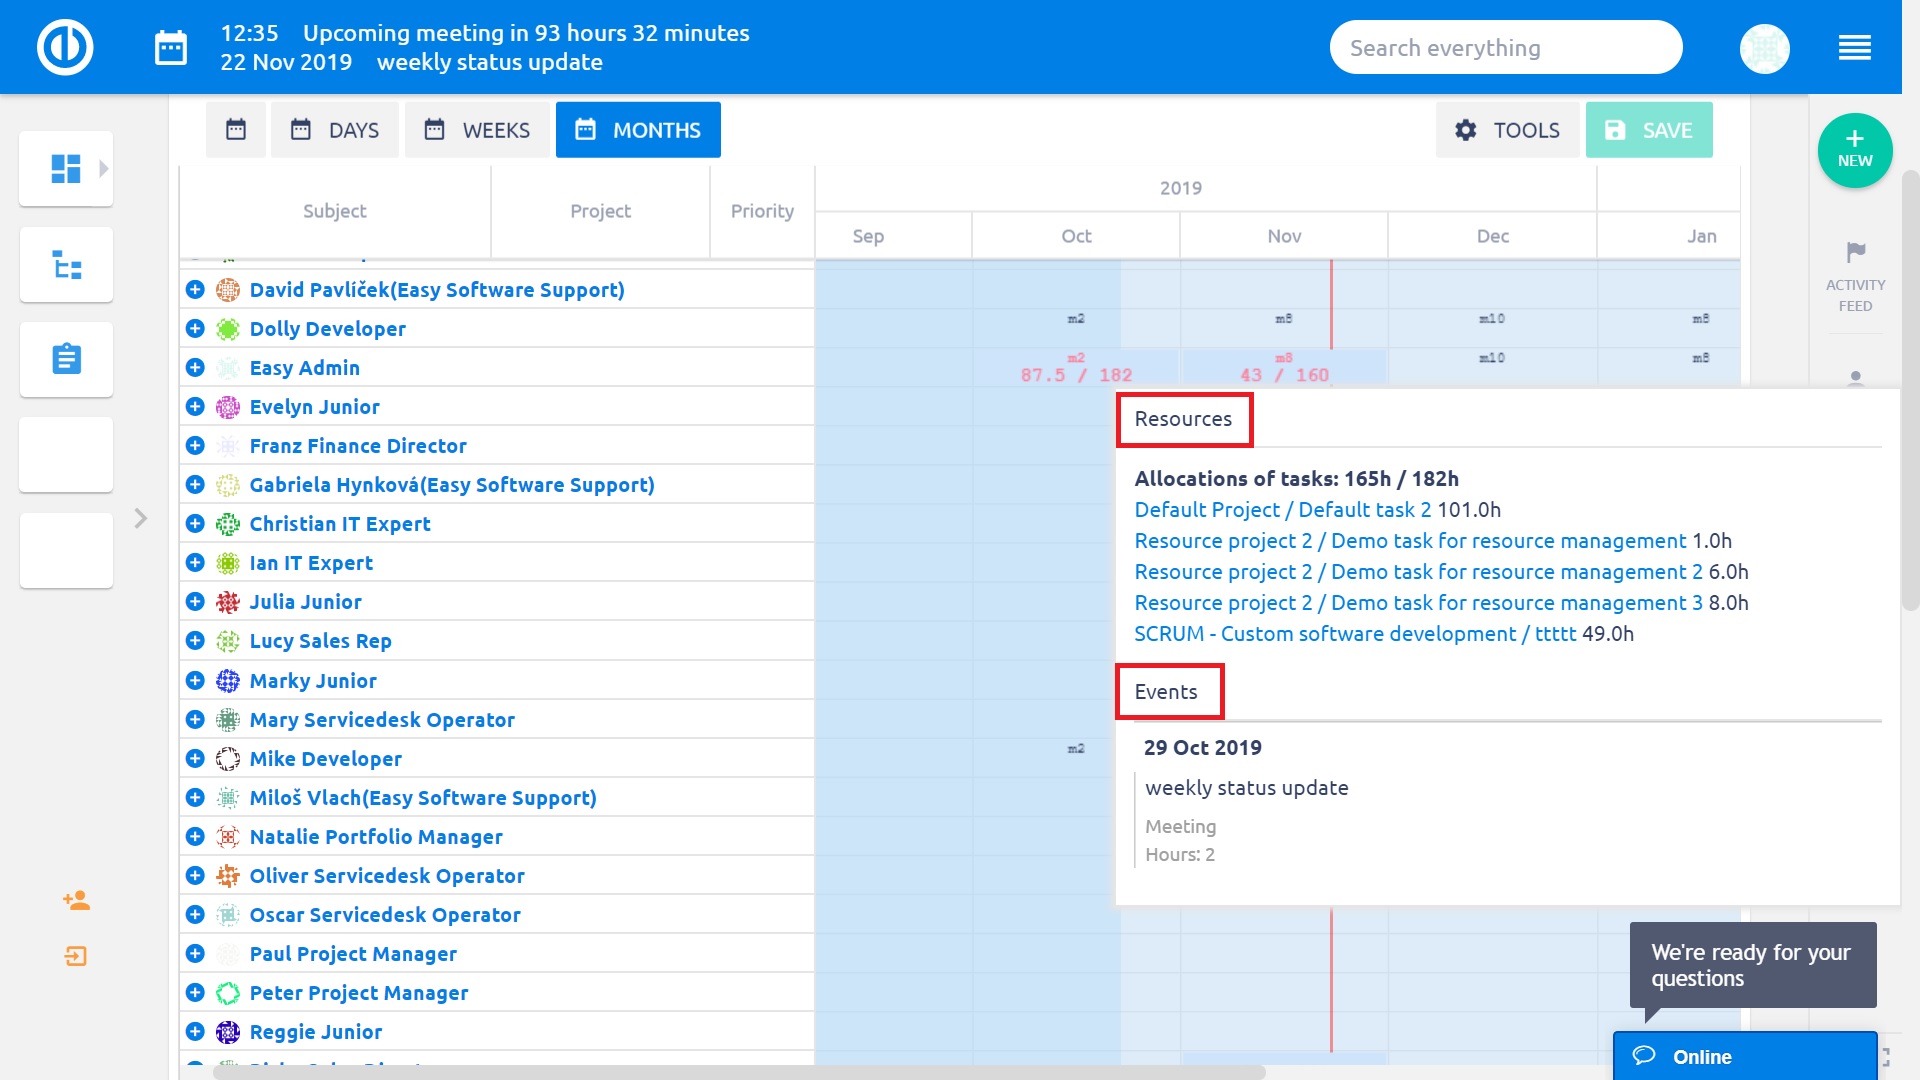
When you have defined a specific time period to be visible on the timeline, it may happen that some tasks have their estimated time allocated partially inside the period and partially outside. In such a case, the hours outside the period are marked "non visible" in allocation tooltip.
Drag & Drop Update of Tasks' timing (Start Date, Due Date, Duration, Completion)
Timing attributes of the tasks (issues) can also be edited just by using drag & drop functionality. Switch to edit mode, move cursor over a task and you have several choices to do: 1) move the task on the horizontal line to change its start date and due, 2) stretch or shrink the task to change its duration, or 3) move the rider of the task to change its % completion.
Step back button (Undo)
When you accidentally do anything wrong, simply take back an unlimited number of steps you have done just by clicking the "Back" button among the main controls. Do not use the Back button to cancel an unsaved custom allocation or Balance reallocation because it does not work well for this purpose (refresh the page using F5 key instead). An already saved allocation can be taken back just manually by the user.
How to use Problems button
The Problems button can be found among the main controls at the top right. The button is complemented with a number that represents the amount of problems identified as illustrated below. Clicking on the button expands the list of the problems including the names of affected tasks and short explanations. These list items are links so you can click on any and that will highlight the respective task on the timeline. Clicking again on the button collapses the list.

Export options
You can print your tables from Resource management or save them as PDF just by clicking the Print button at the bottom row or pressing CTRL+P, which both open the browser print dialog. Changing or adjusting the export size format is always possible in the printing options. Aternatively, you can use an external PDF creator tool, such as Foxit Reader or PDFCreator.
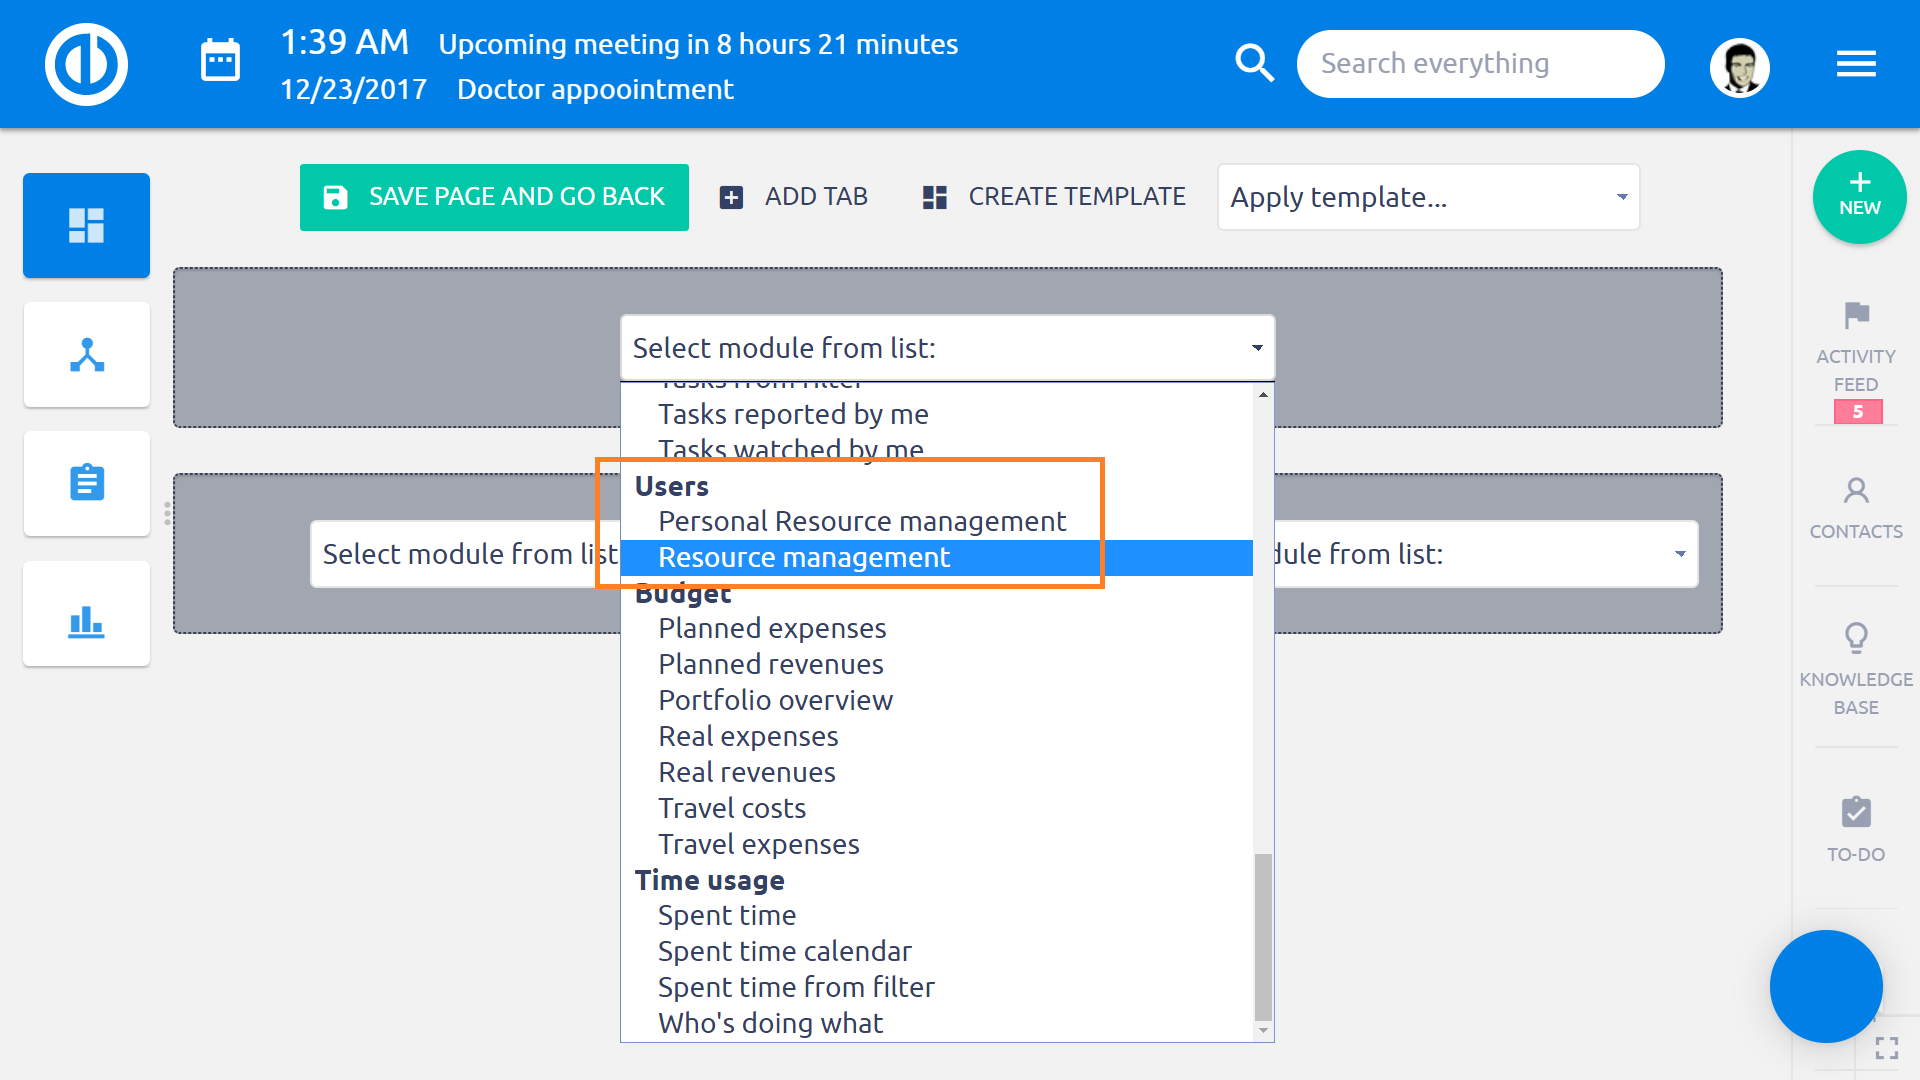
Resource management on the personal home page
You can add either global or personal level Resource management as the module on your personal home page. To do it, click on "Personalize this page" button in the lower left corner and select the particular module from the list. Then customize your filters of the module and save it.
Erőforrás riport
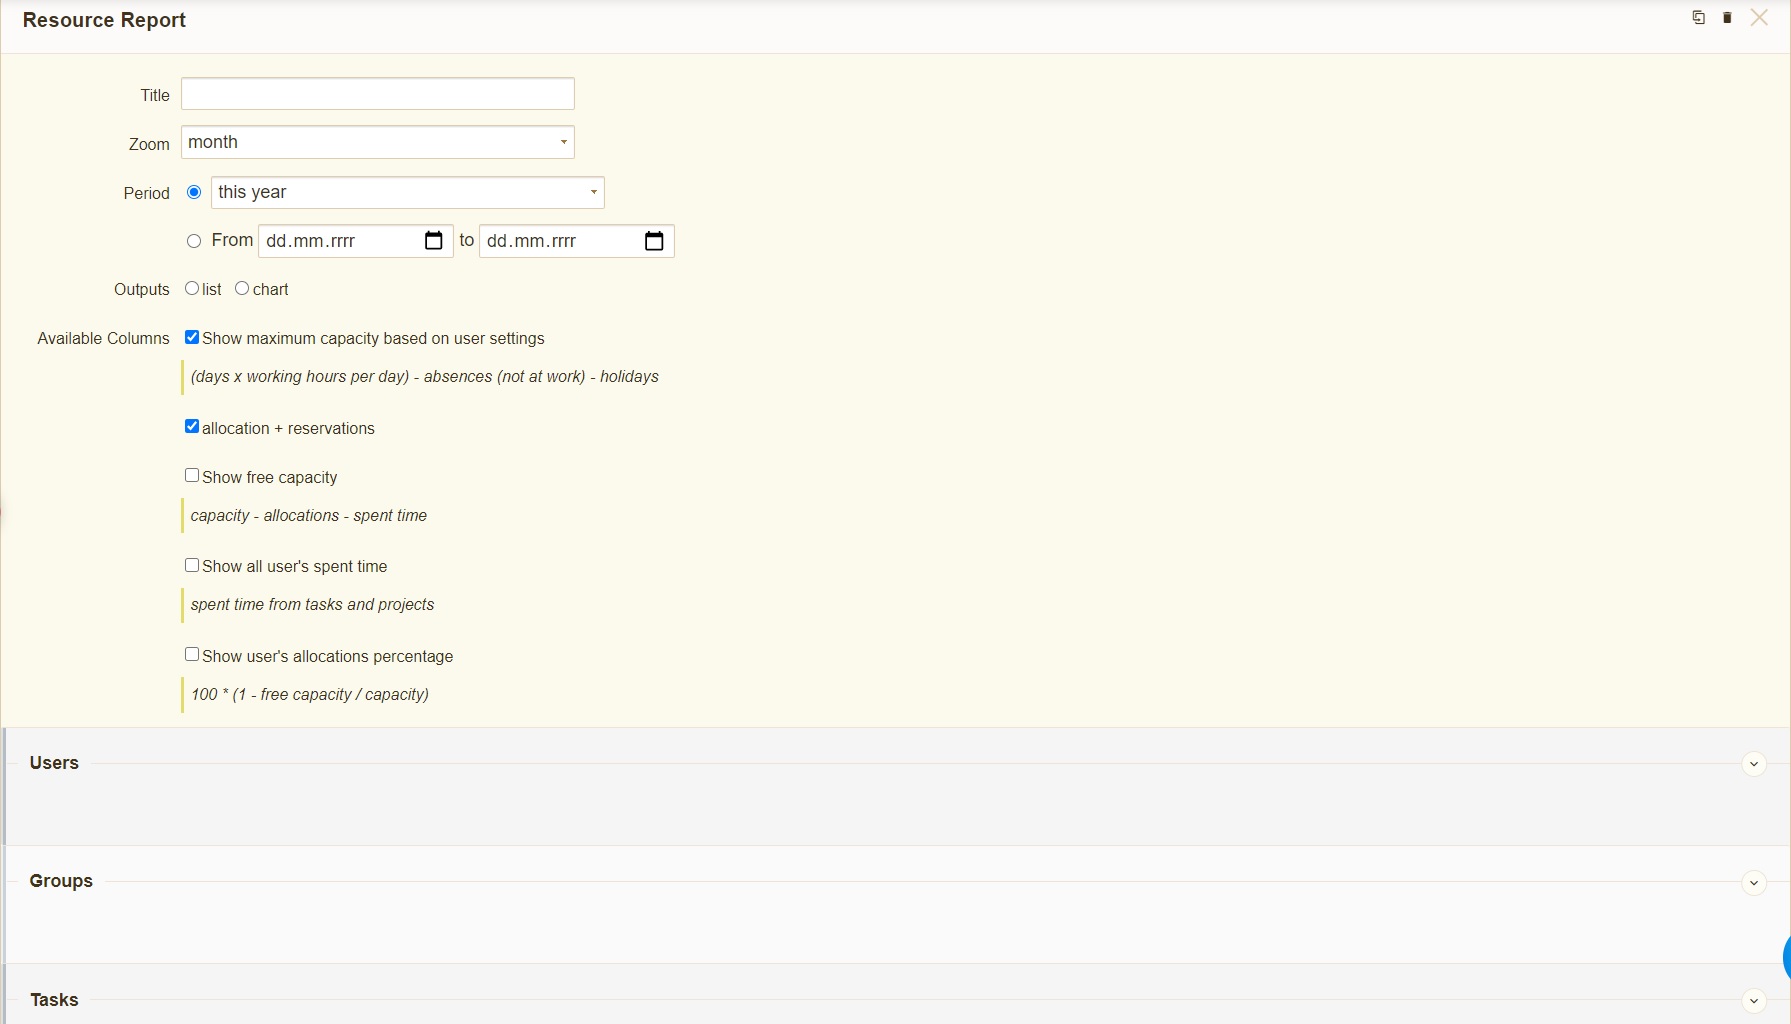
The Resource Report (a report above Resource Management) allows you to quickly create or just check the resource allocations directly from your personal homepage or a project homepage without having to open the main Resource management diagram. The main purpose is to ensure more flexible and time-saving resource management and get a better overview of available resources.
This tool serves primarily as a global overview for company management and tells you how well the company manages its resources, for example, in performing work on tasks (process orders), in fulfilling the full potential (capacity) of resources, in allocating the capacity of resources to work, etc. Based on this information, it is easy to find out whether there is an overall good or bad condition in utilizing the workers' capacity and the consequent need of hiring new workers or dismissing the existing ones. It is therefore also an important tool for the HR agenda.
All data visible in the Resource Report is aggregated data from the Resource Management tool, only it is displayed in a different form. No data or calculations come from any sources other than Resource Management. A correctly configured Resource Report can look like this (list output at the top, the chart at the bottom).
A new page module called Resource Report (under the section Users) is available on any customizable page such as a personal homepage or project homepage. It is a complement of Resource Management plugin and brings:
- Contingency table listing of users and their allocated hours
- Stacked charts

After selecting a module from the list of available modules, a blank form appears, in which it is necessary to fill in the following data:
- Title: the name of the Resource Report
- Zoom: the basic time unit of the Resource Report such as day, week, month, quarter, and year; the Zoom value must always be lower than the Period value to display data correctly
- Period: the visible time period of the Resource Report such as the previous month or this year; the Period value must always be higher than the Zoom value to display data correctly
- Outputs: select list or chart as a visible output type
-
Available columns: select columns to display in Resource Report such as:
- Show maximum capacity based on user settings: (days x working hours per day) - absences (not at work) - holidays
- Show allocation + reservations: as configured in Resource Management
- Show free capacity: capacity - allocations - spent time
- Show all user's spent time: spent time from tasks and projects
- Show user's allocations percentage: 100 * (1 - free capacity / capacity)
Below on the form, you can add your custom filters to Resource Report. The filtering is possible above users, groups, and tasks. If you do not set up a filter for groups, you will always see them. Filtering allows you to see only such entities you are interested in and omit all the rest. The same filtering is possible in Resource Management as well.
In a created Resource Report, you can display details in a pop-up window by moving the mouse cursor over any column (in the chart output type only). To edit, remove or collapse the Resource Report on a customized page, simply use the icons in the top right corner.
Tippek és trükkök
Hogyan használja "Képesség menedzsment" eszközként
Szerver követelmények
Csak Ruby 2.1+ támogatott.
Megjegyzések a modul használatához
-
Projektek közötti feladat-kapcsolatokat nem tud megjeleníteni.
-
Megjeleníteni a megelőző/követő (zöld vonal) és a függ tőle/blokkolja (kék vonal) kapcsolatot lehetséges a diagramon.
-
A kezdés-kezdés (SS) kapcsolat akkor lesz helyes, ha a Gantt nézetben hozza létre, nem pedig afeladatszerkesztő felületen.
-
Szülő és gyermek feladat között nem tud logikai függőséget meghatározni.
-
Két feladat között legfeljebb két kapcsolatot határozhat meg (kezdés-kezdés, befejezés-befejezés).
-
Nem hozható létre olyan kapcsolat, ami ciklikus folyamatot (hurkot) eredményezne. Ezt vegye figyelembe, amikor alfeladathoz akar kapcsolatot létrehozni.
-
A task on the timeline cannot be edited so that it starts or ends on the day of the public holiday according to the calendar of the currently logged-in user, even though the assignee of the given task does not have a holiday on that day.
-
There can be only one Gantt module on customizable pages (homepage, project overview, etc.). This includes modules: Easy Gantt, Resource management, Personal Resource management - if one of these is active, no other will be shown on the same page. This is due to page loading speed. A workaround is to put these modules on different tabs of customizable pages.
-
If a task contains custom allocations, these will get lost after the task is closed and reopened. The new allocations are calculated according to the default allocator.
-
When editing a task using the Quick task editor in Resource Management, the changes will not be saved unless the user clicks on the Save button in the top right corner of the timeline window.
-
The edit option of the estimated time for a specific project in Resource Management is disabled if the Spent time module is not activated for that particular project.